
Reztori QR Menu Documentation
A complete, step-by-step guide to setting up and running your digital menu — from buying the plugin to putting every feature to work on your live site.
1. System Requirements
Before installing Reztori QR Menu, make sure your hosting environment meets the following minimum requirements for a smooth, stable experience:
- PHP — Version 7.4 or later, required for Reztori QR Menu Free & Pro.
- Database — MySQL 5.7 or later.
- WordPress — Version 6.0 or higher.
2. Download the Plugin & Upload to Site
Acquire the plugin distribution package archive file
(reztori-qr-menu.zip) directly from your user account
management dashboard.
-
Log in to your WordPress website administration dashboard
(
/wp-admin/). - Navigate to Plugins > Add New.
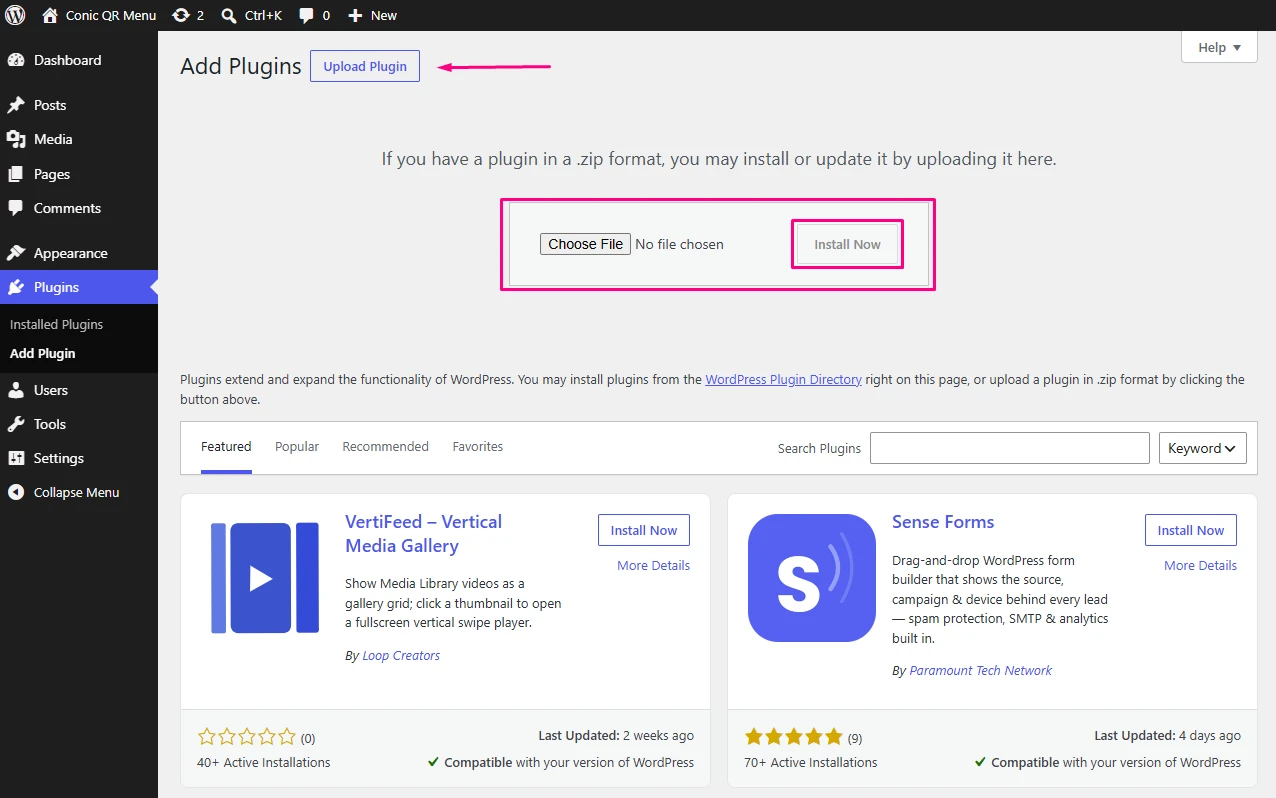
- Click the top action button labeled Upload Plugin.
- Choose the downloaded zip file from your computer and click Install Now.
or else
-
Log in to your WordPress website administration dashboard
(
/wp-admin/). - Navigate to Plugins > Add New.
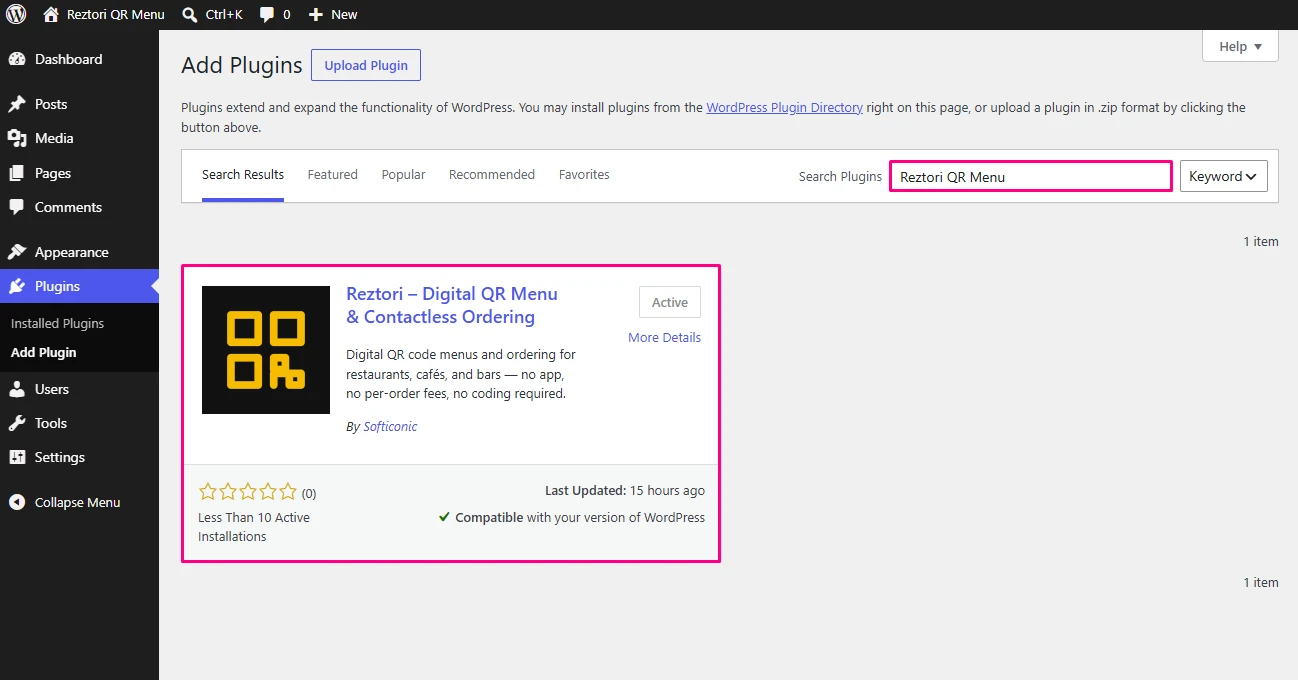
- Type Reztori QR Menu into the search box in the top-right corner.
- Find it in the results and click Install Now, then click Activate once it finishes installing.
3. Activate the Plugin
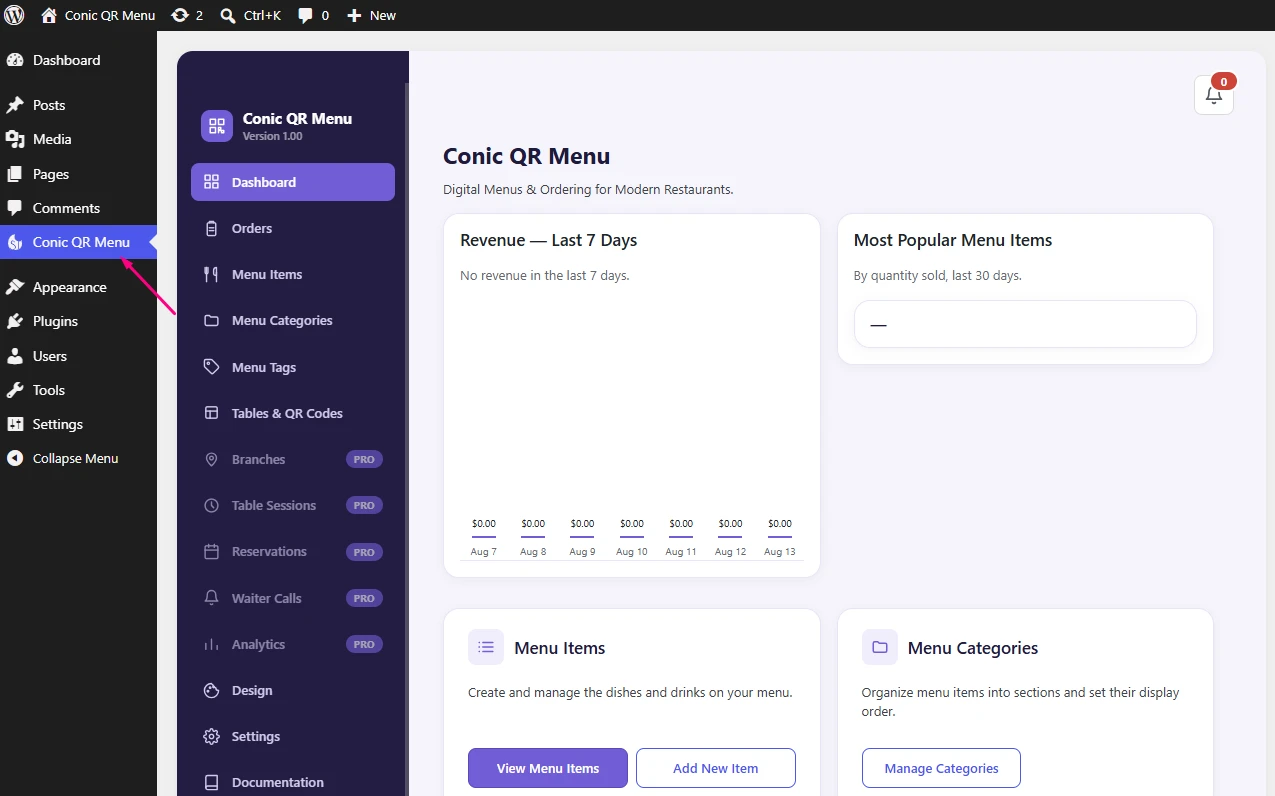
Step: After successful installation, click Activate Plugin. A new "Reztori QR Menu" configuration tab will appear directly on your WordPress admin sidebar menu.
4. License Activation
To unlock the full potential of (table sessions, reservations, waiter calls, analytics, languages, multi-branches, card payments, and advanced menu templates & colors) PRO you need a Softiconic license.
Step: Visit the official Softiconic pricing page, choose your subscription plan (Free or Pro license tier), and complete the secure checkout process.
Once purchased, you will receive an account dashboard login where you
can download the latest stable release package of the
Reztori QR Menu Pro plugin along with your unique license
key.
For license activation, Upload & Install the
Reztori QR Menu Pro plugin file to your WordPress site.
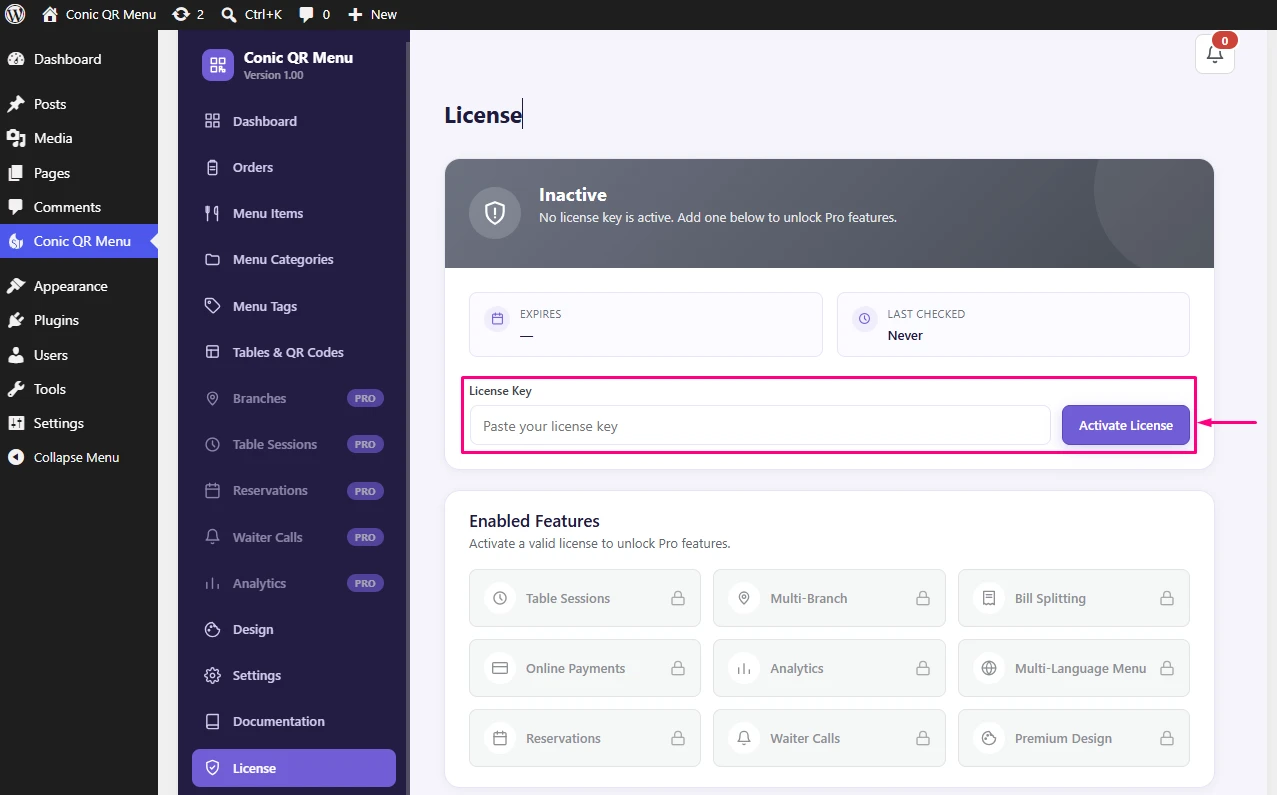
Then Activate the plugin, after that go to the plugin
license panel, input your license key into the activation field, and
click Activate License to enable automatic updates
and premium features.
5. Quick Setup Walkthrough
This is the fastest path from a freshly activated plugin to a working QR menu your customers can scan and order from. Do these in order the first time — later sections go deeper on each screen.
Step 1 — Find the plugin in your dashboard
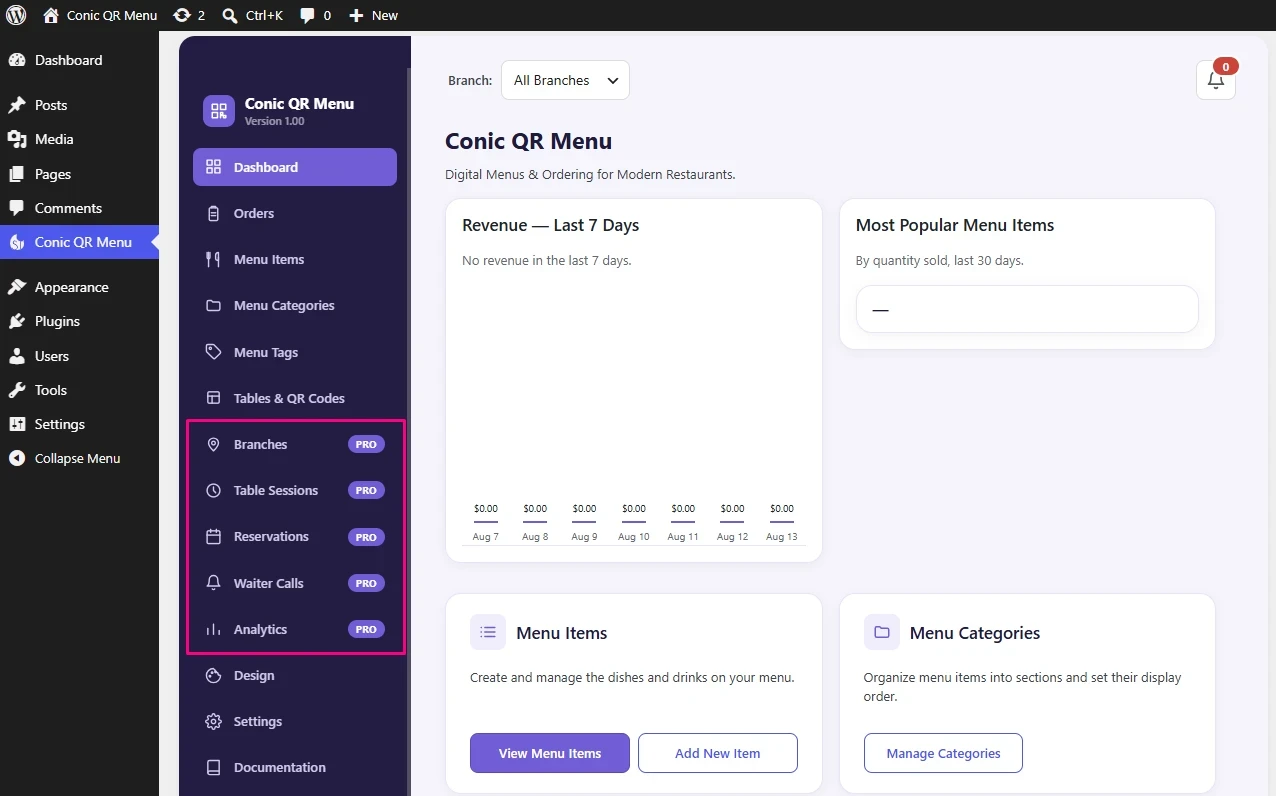
After activation, look for Reztori QR Menu as its own top-level menu in the WordPress admin sidebar (left-hand side, below Comments/Appearance). Everything in this guide lives under that one menu — its submenus are Menu Items, Menu Categories, Menu Tags, Tables & QR Codes, Orders, Design, Settings, and Documentation, with extra Pro-only submenus (Branches, Table Sessions, Reservations, Waiter Calls, Analytics) PRO appearing automatically once a Pro license is activated.
Step 2 — Build your menu
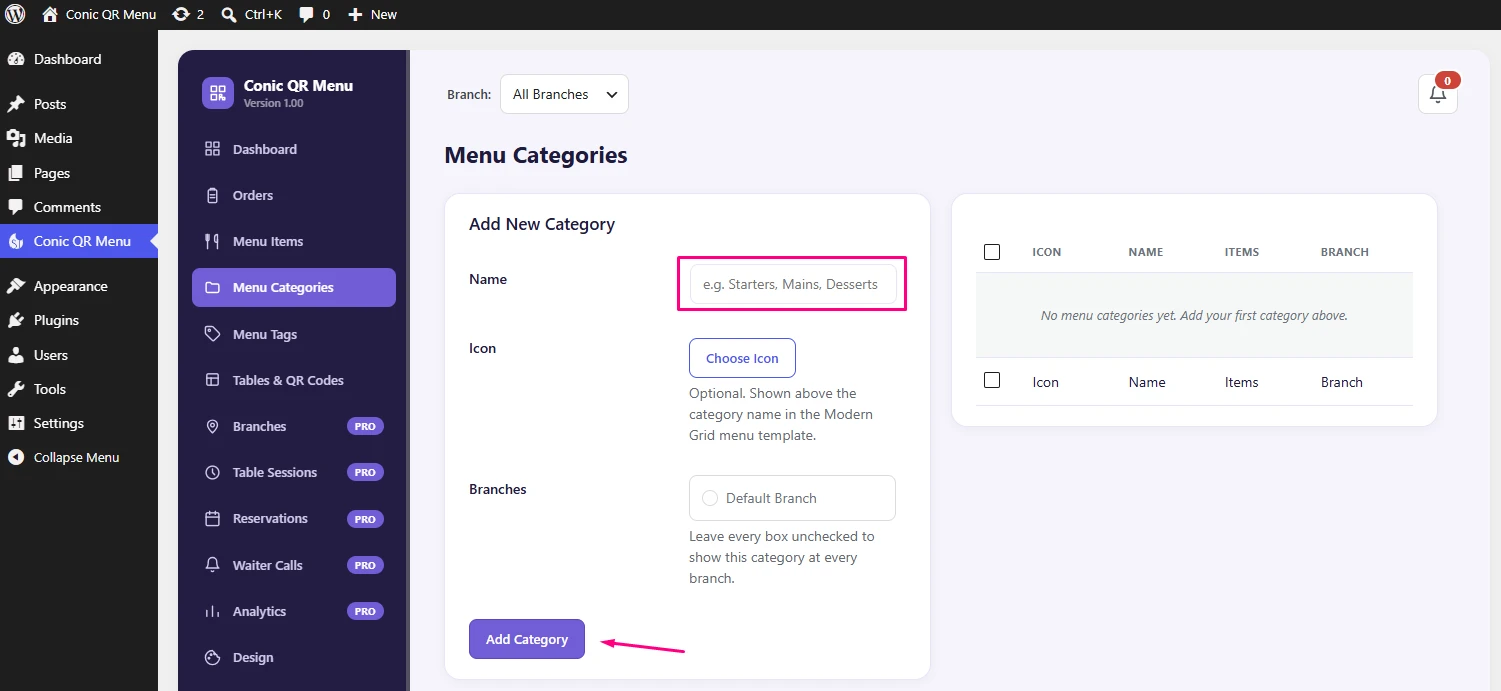
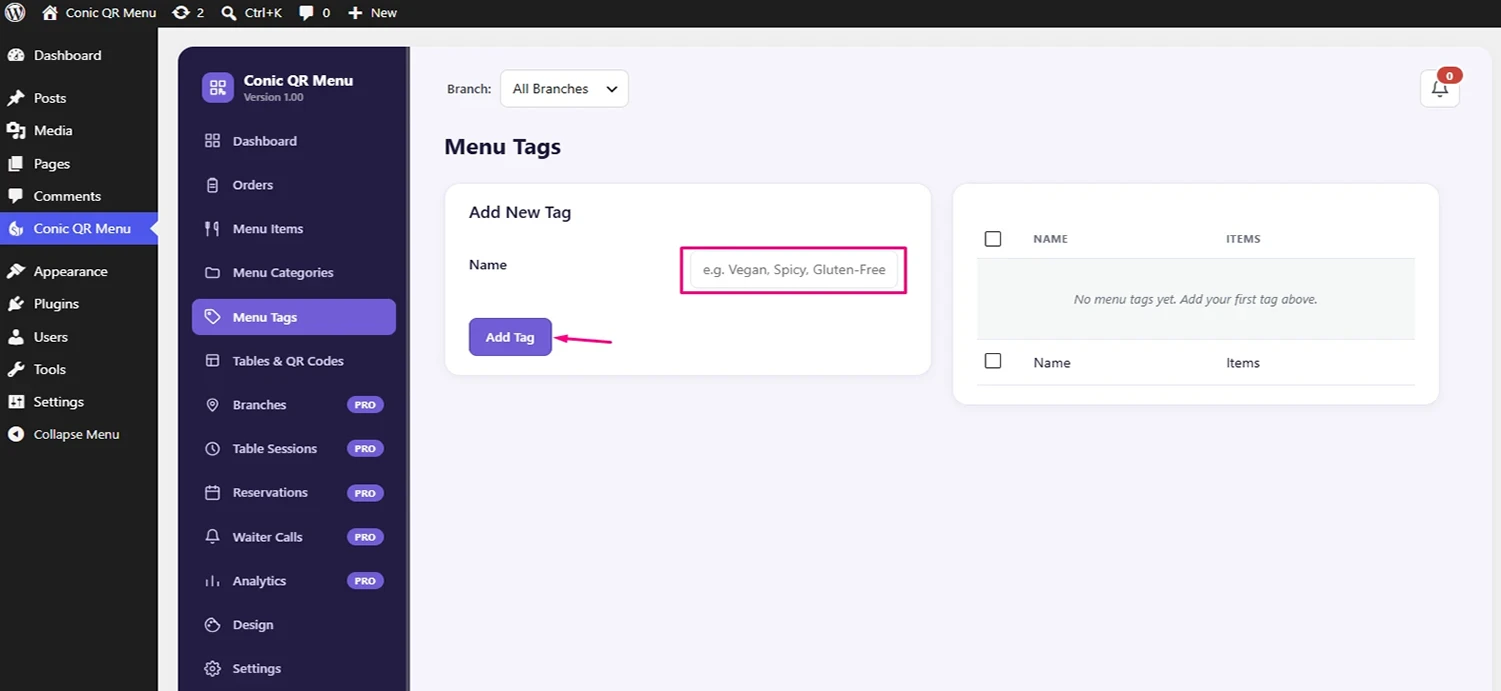
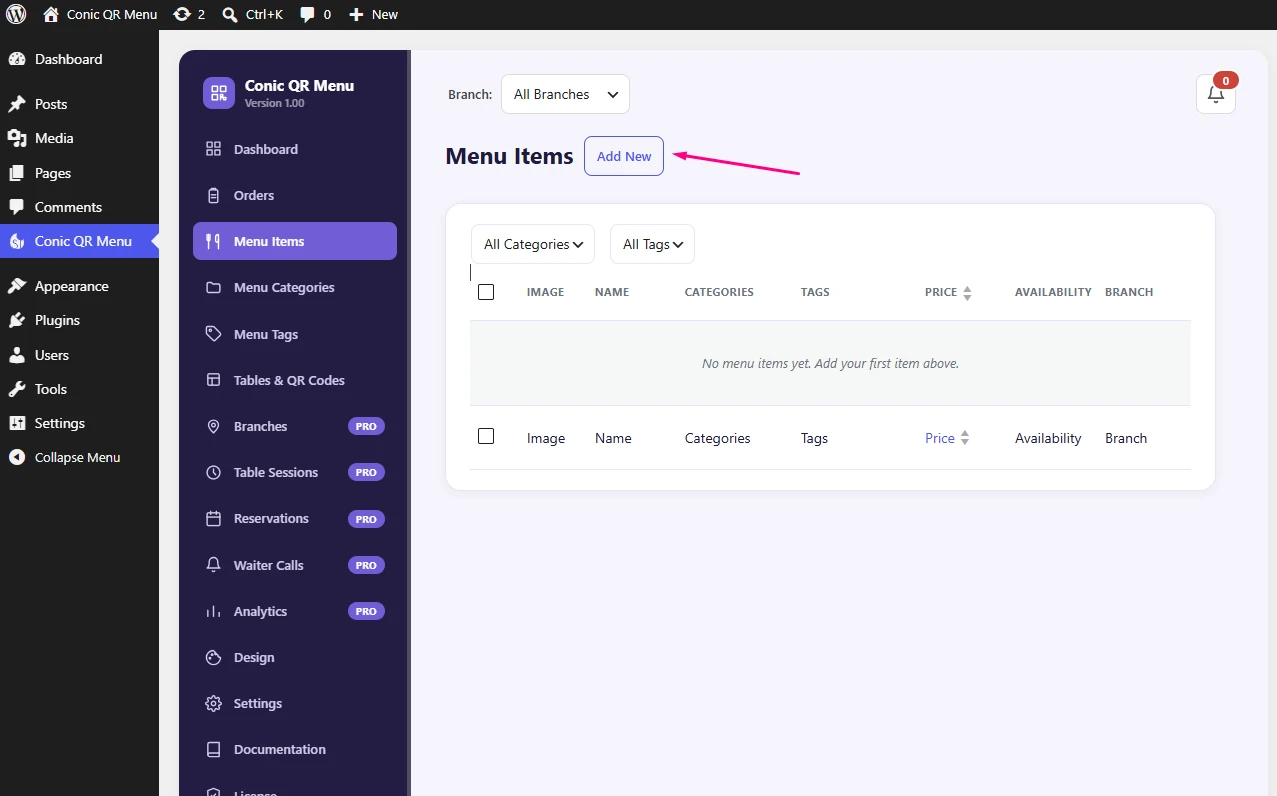
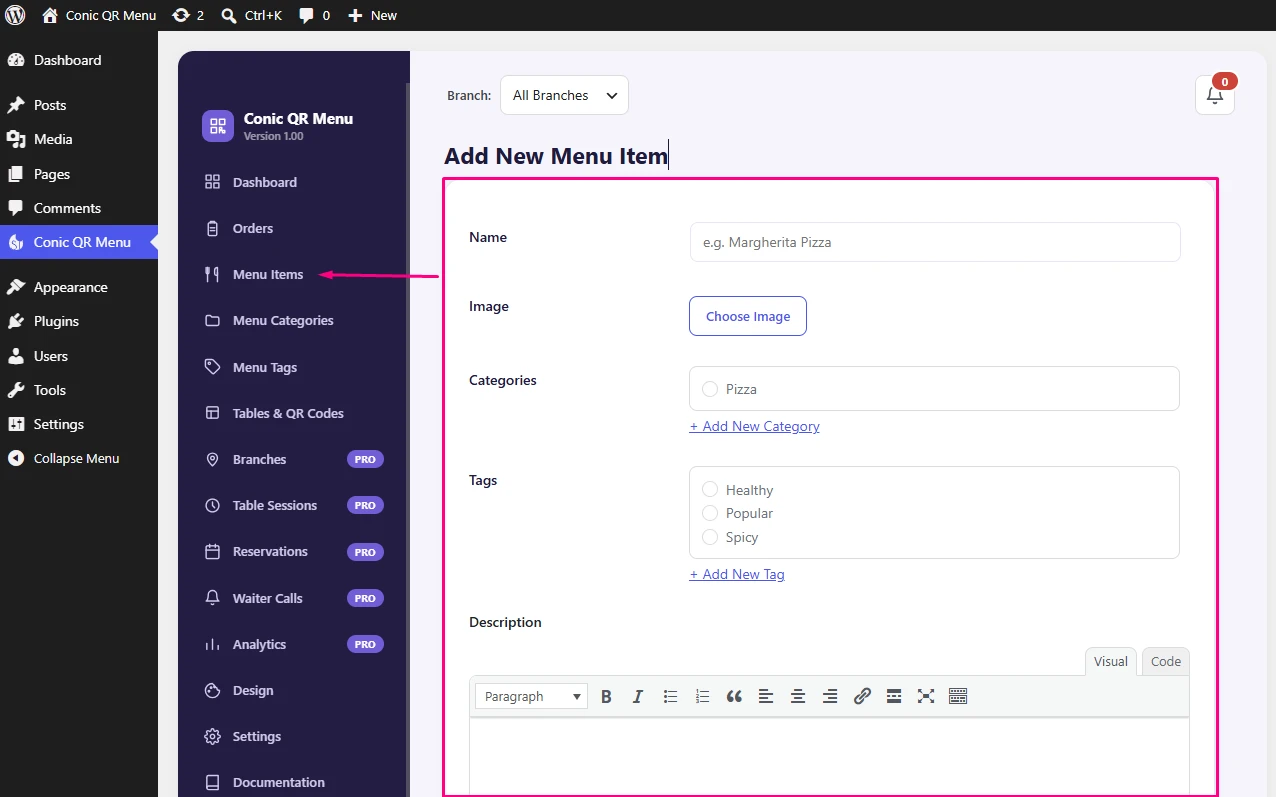
Open Reztori QR Menu > Menu Categories. Create a category for each section of your menu (Starters, Mains, Drinks, etc.), then add items Reztori QR Menu > Menu Items one by one: name, description, photo, price, weights, and any badges or dietary flags that apply. If an item comes in different sizes or has optional extras, set those up as a Variant Group or Add-on Group on the item itself — see Using Core Features for the exact fields.
Step 3 — Set up tables and print QR codes
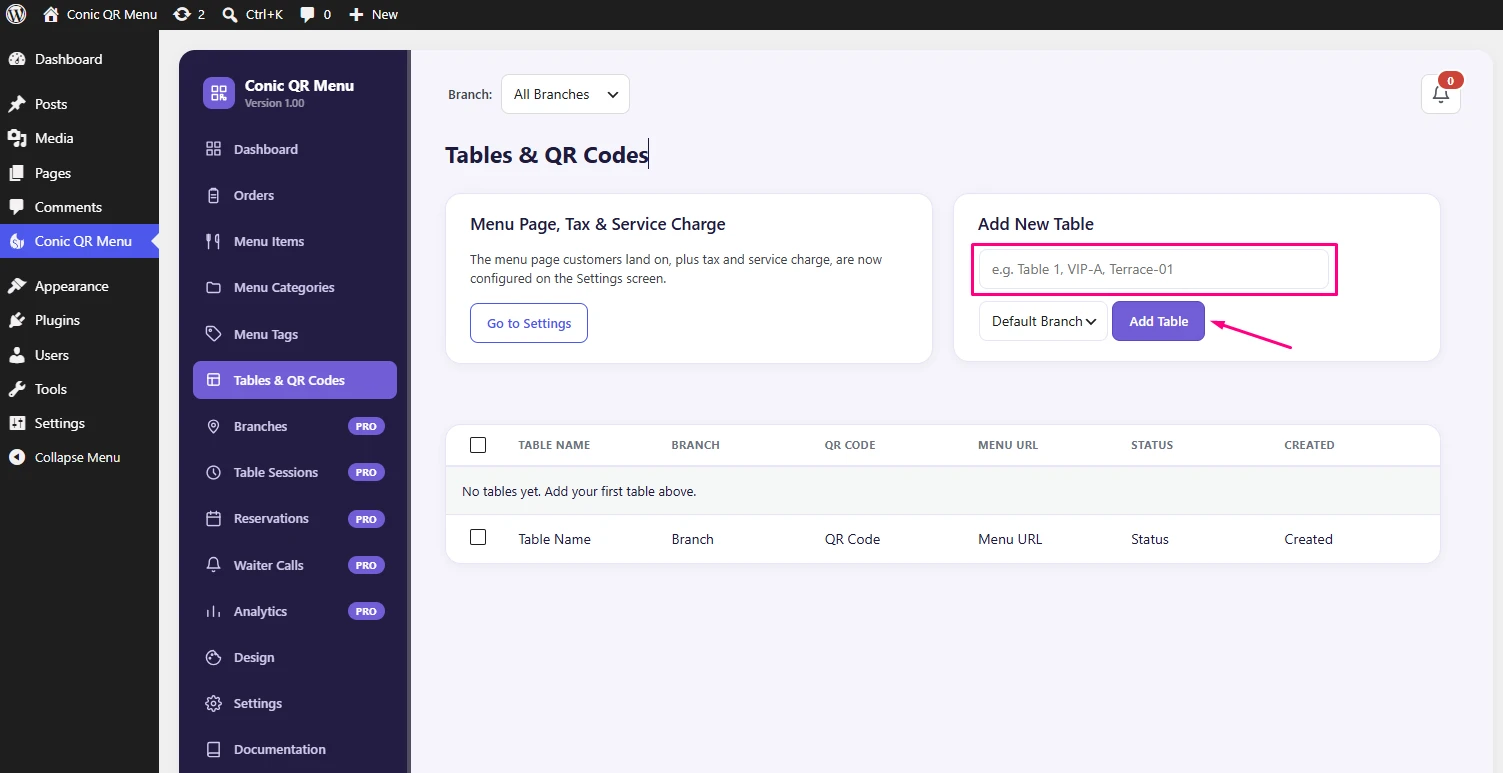
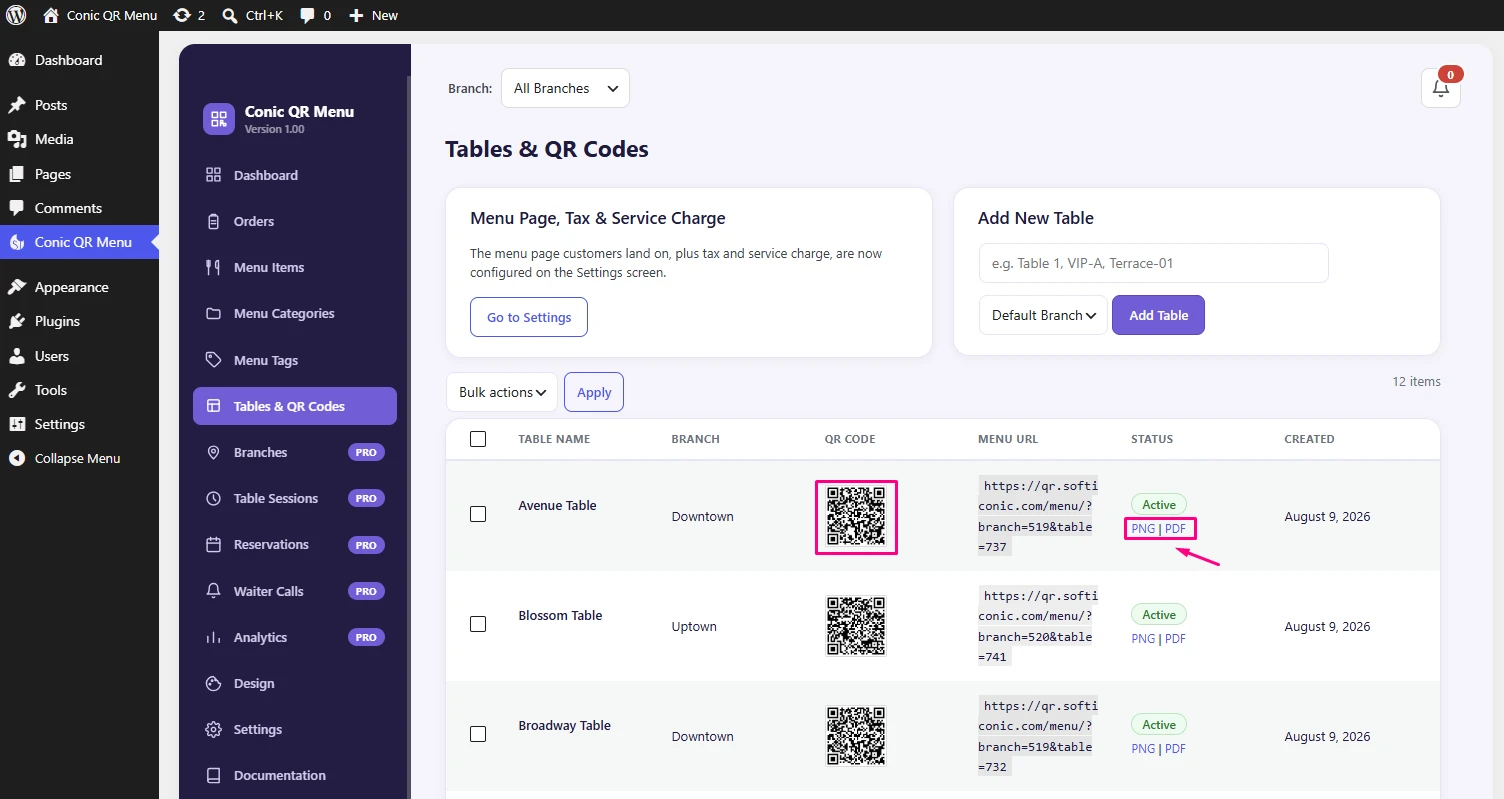
Go to Reztori QR Menu > Tables & QR Codes and add one entry per physical table (Avenue Table, Blossom Table, Broadway Table, and so on). Each table gets its own QR code — download it as PNG or PDF and print it onto a table tent or sticker so a scan always tells you which table an order came from.
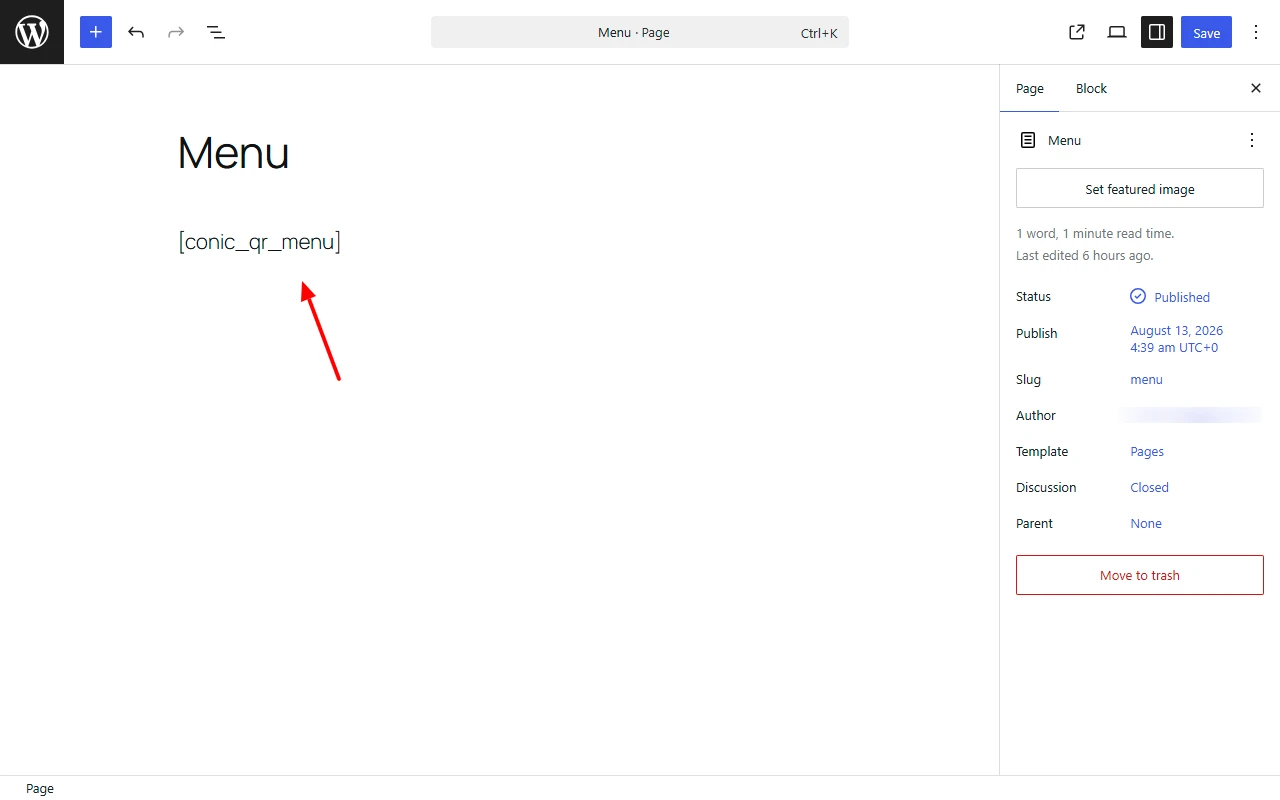
Step 4 — Use the menu page the plugin already created for you
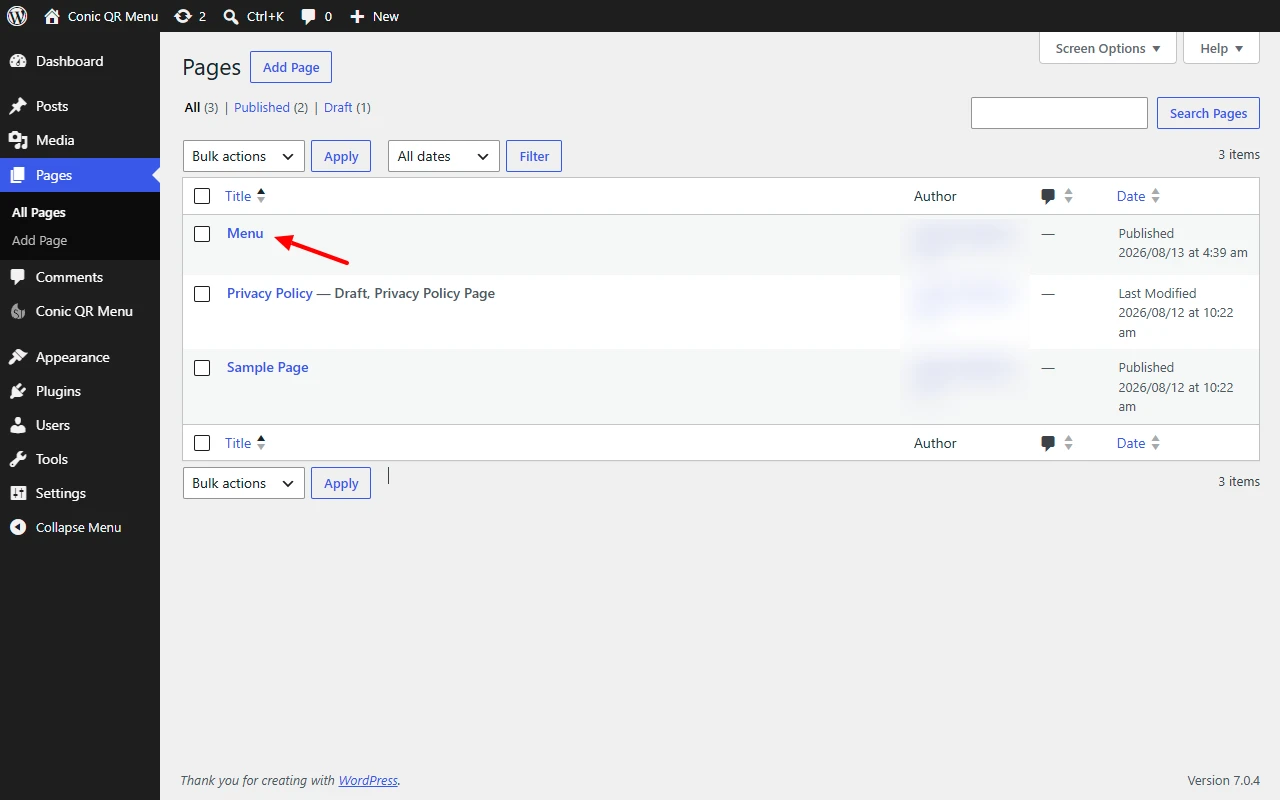
On activation, the plugin automatically creates a WordPress page
(usually titled "Menu") with the
[rztqm_menu] shortcode already placed inside it — you can
find it under Pages in your dashboard. Open it, check
the page looks right in the preview, and click
Publish (or Update, if it's already published). This
page's URL is what every QR code should point to.
You don't need to understand shortcodes to get started — but it helps
to know what's happening: the single line
[rztqm_menu] on that page is what tells WordPress "render
the full digital menu here." If you ever want a second menu page with
a different look, create a new page and add the shortcode yourself;
see Shortcode API Reference for the full
syntax and optional attributes.
Step 5 — Fill in your restaurant details
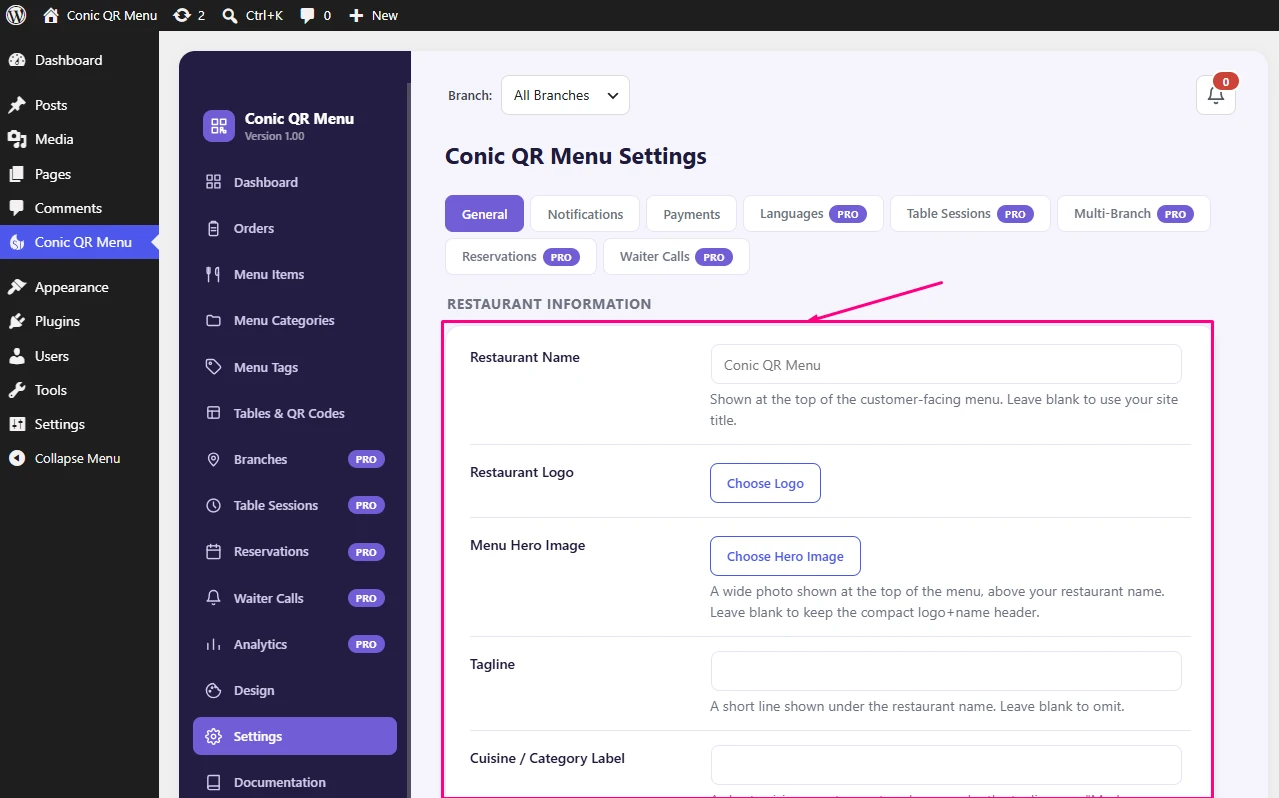
On Reztori QR Menu > Settings, enter your restaurant name and contact info, pick your currency, and set any tax or service charge percentages. These apply automatically at checkout, so double-check them before you go live.
Step 6 — Choose a template and color
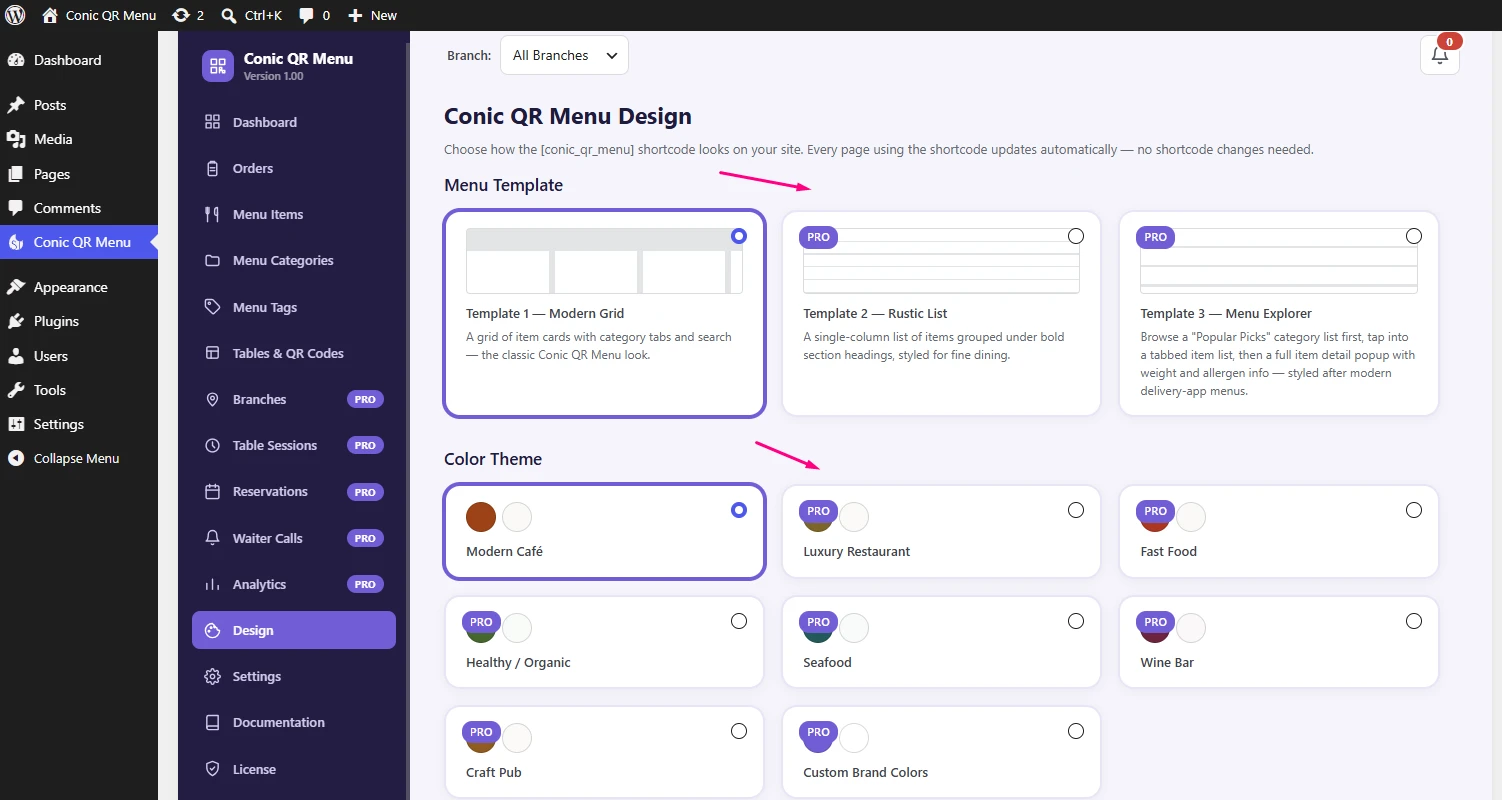
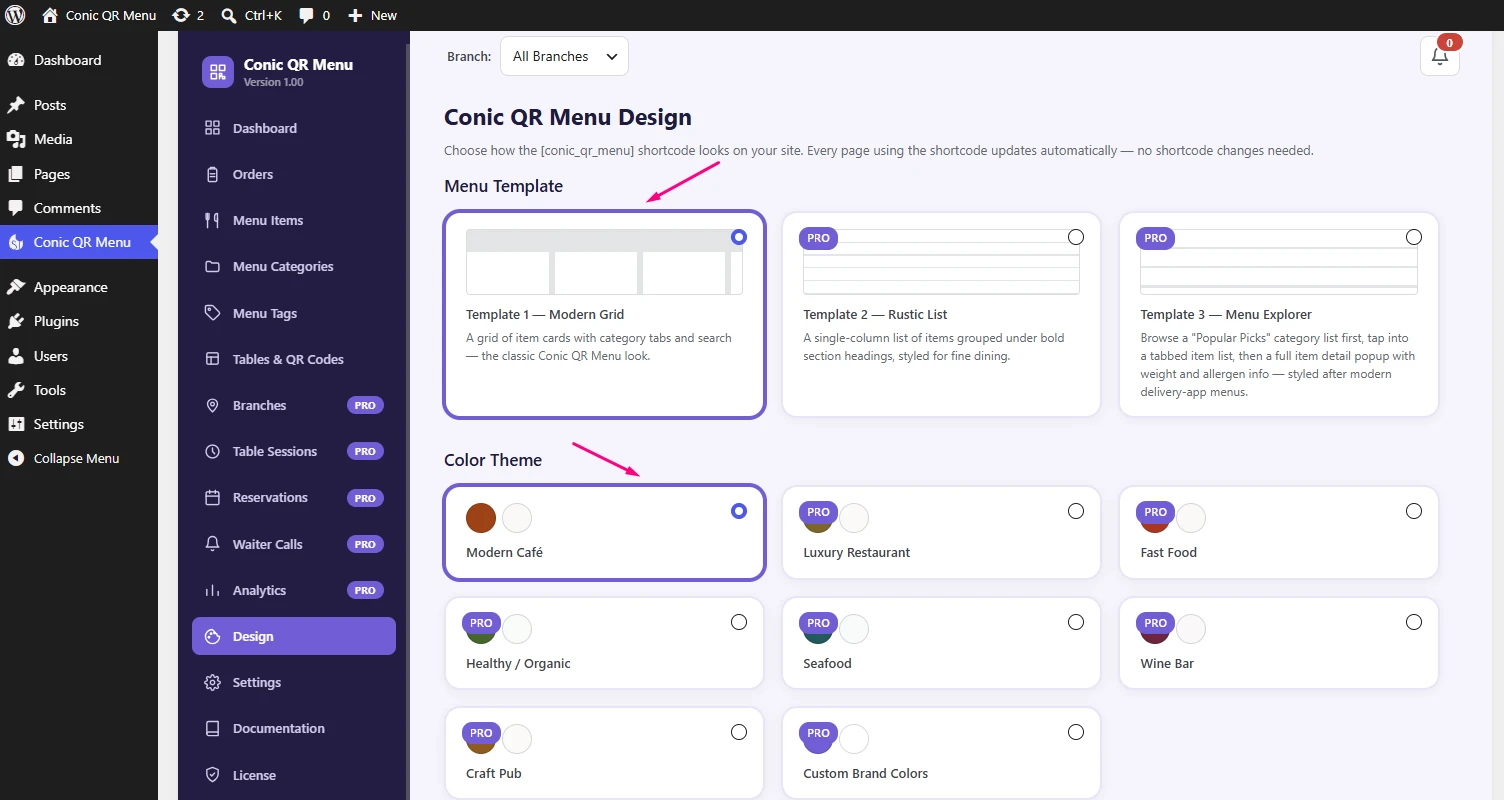
On Reztori QR Menu > Design, each Menu Template is
shown with a number — Template 1 "Modern Grid"
FREE Template 2 "Rustic List"
PRO and Template 3 "Menu Explorer"
PRO — alongside a set of Template
Colors like "Modern Café" FREE or
"Seafood" PRO. Whatever you pick here
becomes the site-wide default, used automatically by every page with a
plain [rztqm_menu] shortcode — no extra setup needed.
If you ever want one specific page to use a different template or color than the site-wide default (say, a seasonal menu page in a different theme), add the same numbers you see on the Design screen as shortcode attributes instead of changing the global setting:
-
[rztqm_menu template="2"]— show that page in Template 2 ("Rustic List"), regardless of the site-wide choice. -
[rztqm_menu color="seafood"]— show that page in the "Seafood" color. -
[rztqm_menu template="3" color="wine-bar"]— combine both on the same page.
Both overrides require an active Pro license; without one, the attribute is ignored and the page simply falls back to whatever's set on the Design screen.
Step 7 — (Pro) Take reservations from your site
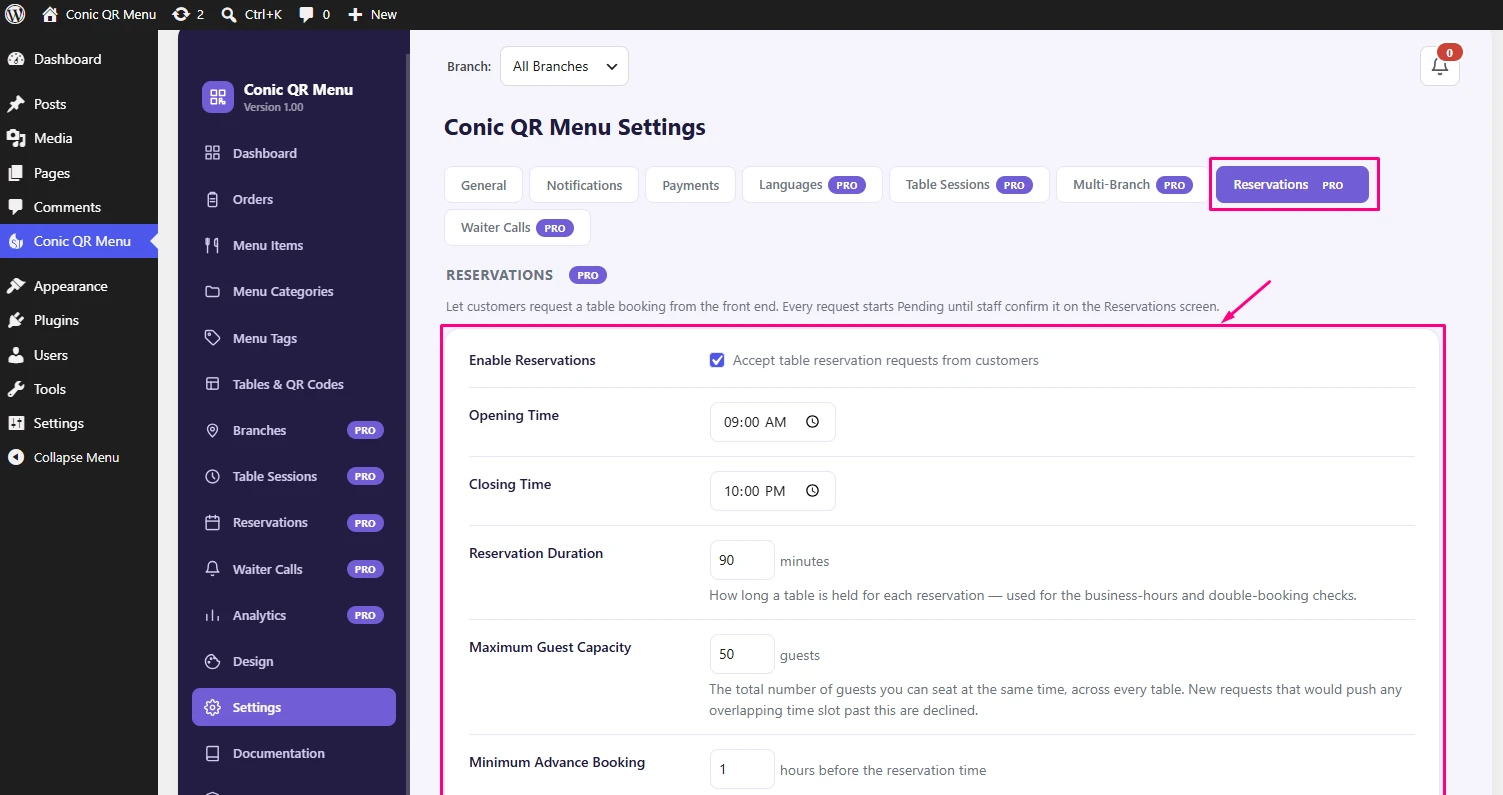
If you're on Pro and want customers to book a table instead of only
walking in, set your hours, seating capacity, and booking limits on
Reztori QR Menu > Settings > Reservations. Then
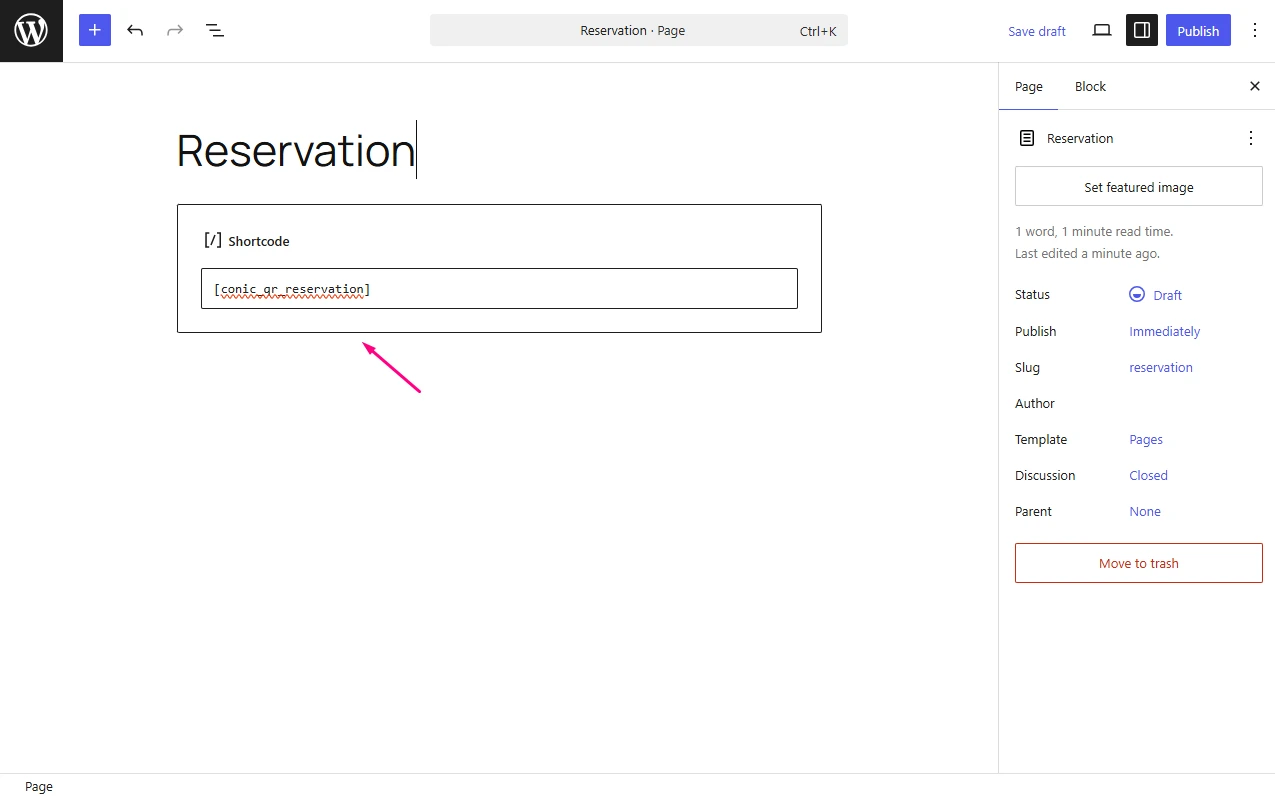
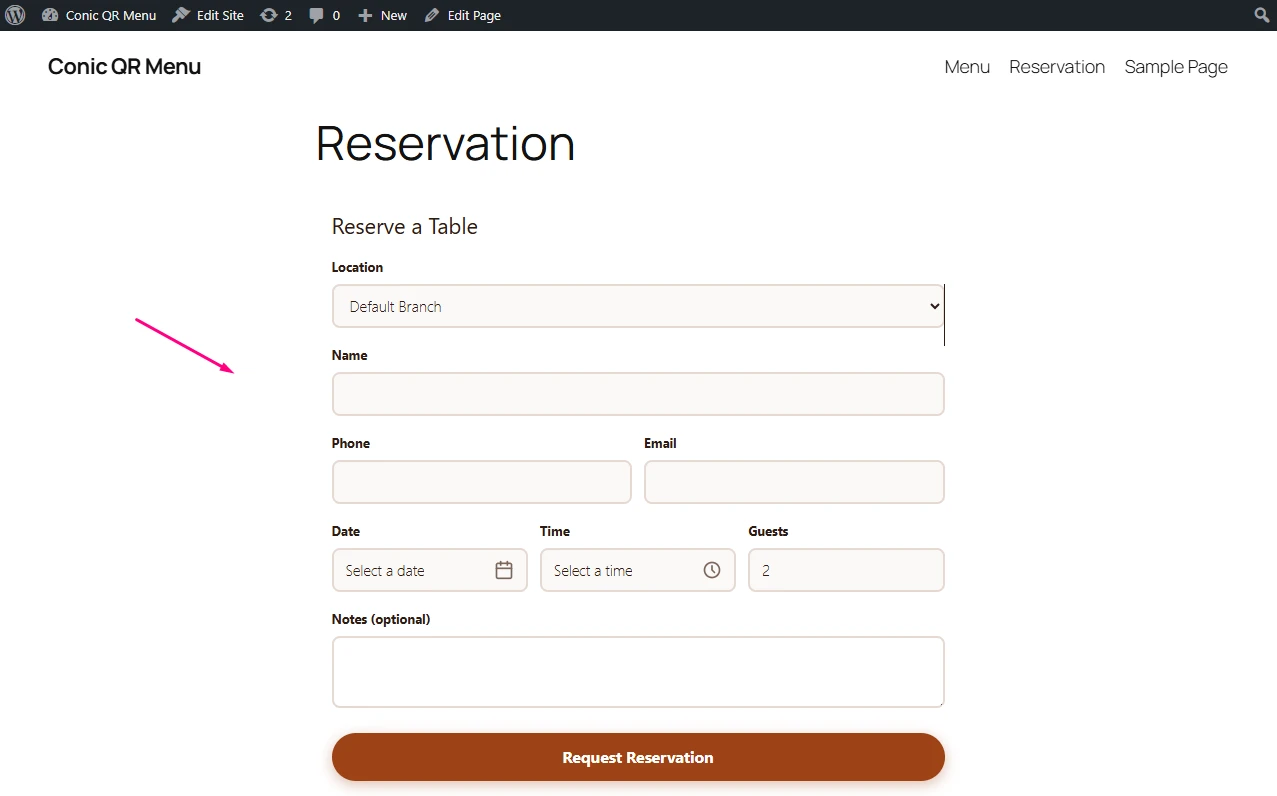
create a page (e.g., "Reservation") and add the
[rztqmp_reservation] shortcode to it — unlike the menu
shortcode, it takes no attributes, since every setting is pulled from
that Reservations screen. Publish the page and link to it from your
site's main menu so guests can find it easily.
Step 8 — Take a test order
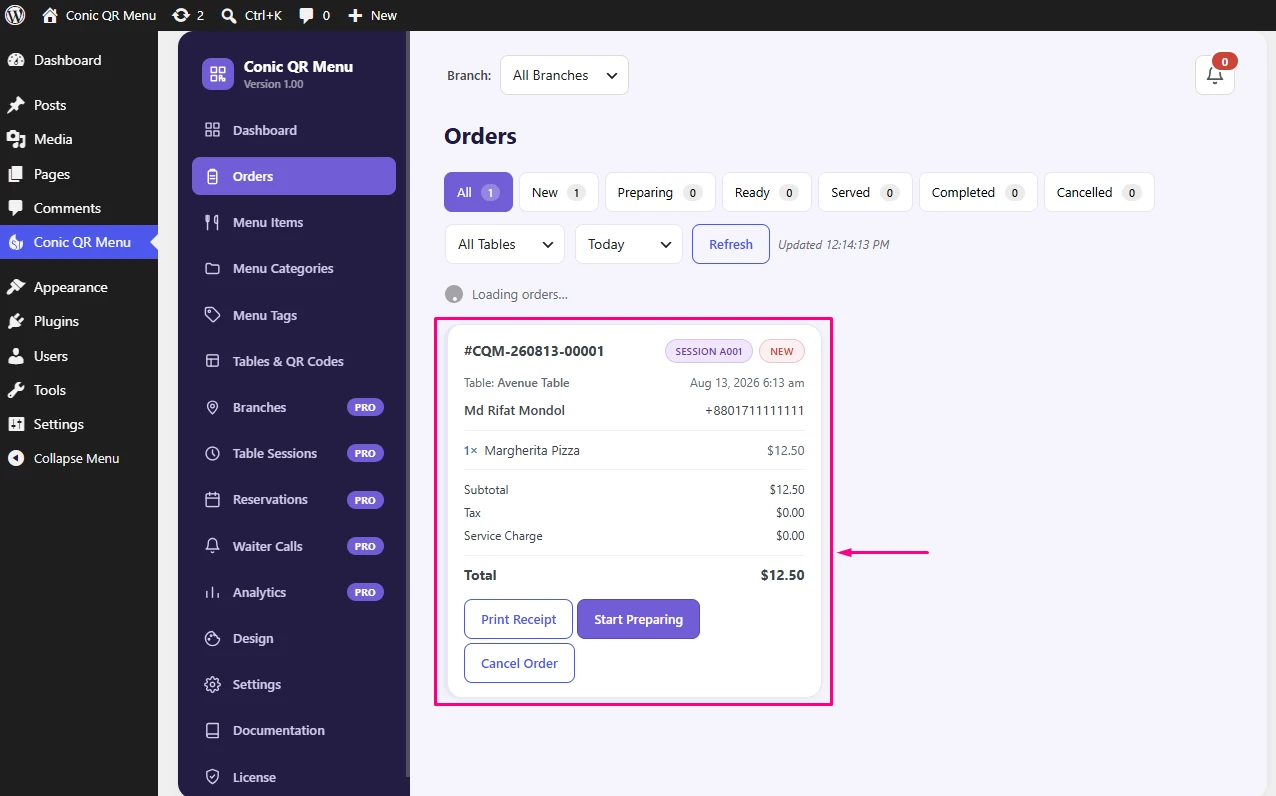
Scan one of your own QR codes with your phone, add an item to the cart, and place a test order. Confirm it shows up on Reztori QR Menu > Orders so you know staff will actually see incoming orders before customers start scanning for real.
Once this is working, jump to Using Core Features to learn the daily-use screens (orders, categories, item options), or to Using Pro Features if you're on a Pro license and want multi-branch, reservations, online payments, or premium templates.
6. Using Core Features
These are the screens you'll use every day to run the menu, whether or not you ever add a Pro license.
Add and organize menu items
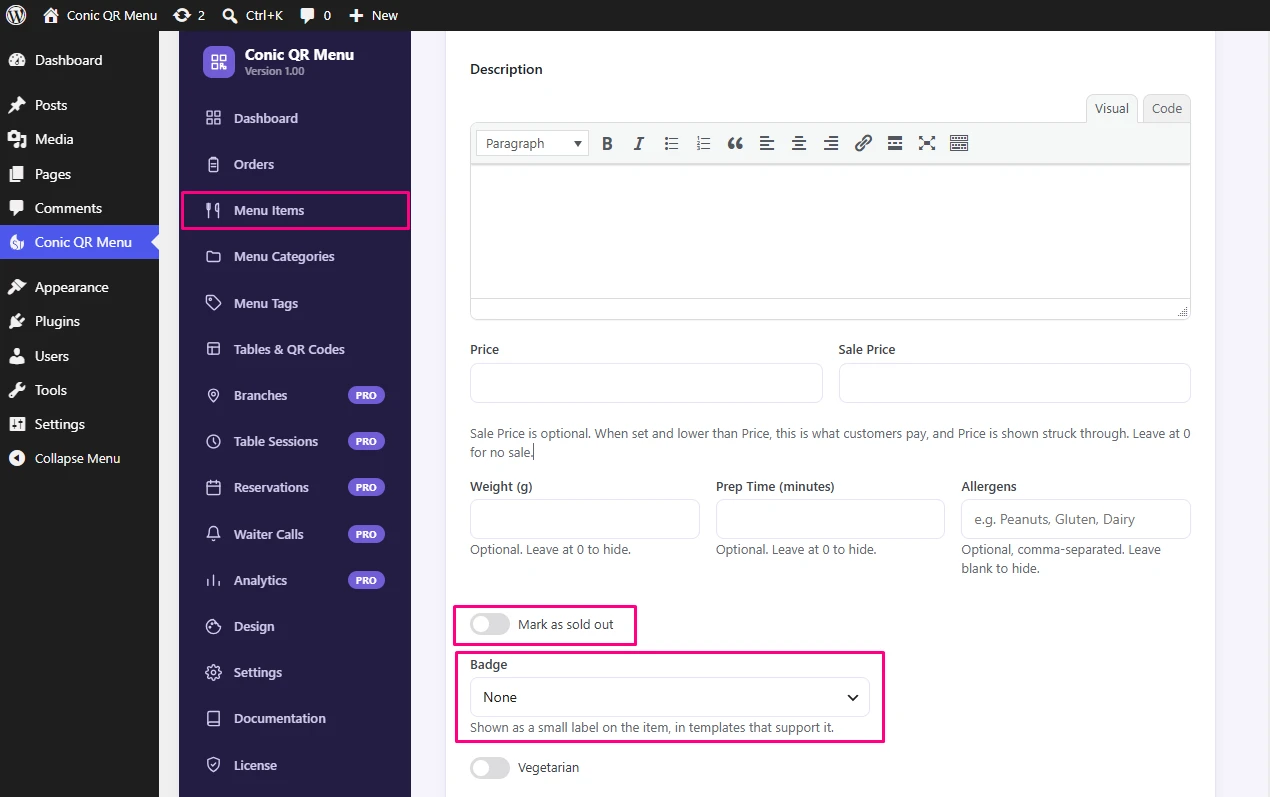
Under Menu Items, each item has a name, description, photo, price, weight (g), prep time (minutes), and an allergens field — fill these in so customers can make informed choices before ordering. Toggle an item Sold Out when you run out instead of deleting it, so it stays visible but greyed-out and un-orderable. Use the Recommended or New badge to draw attention to specific dishes, and the vegetarian flag to power the Veg/Non-Veg filter customers see on the menu. To run a promotion, add a sale price — it displays struck through next to the regular price, and only the sale price is charged at checkout.
Giving customers choices: variants and add-ons
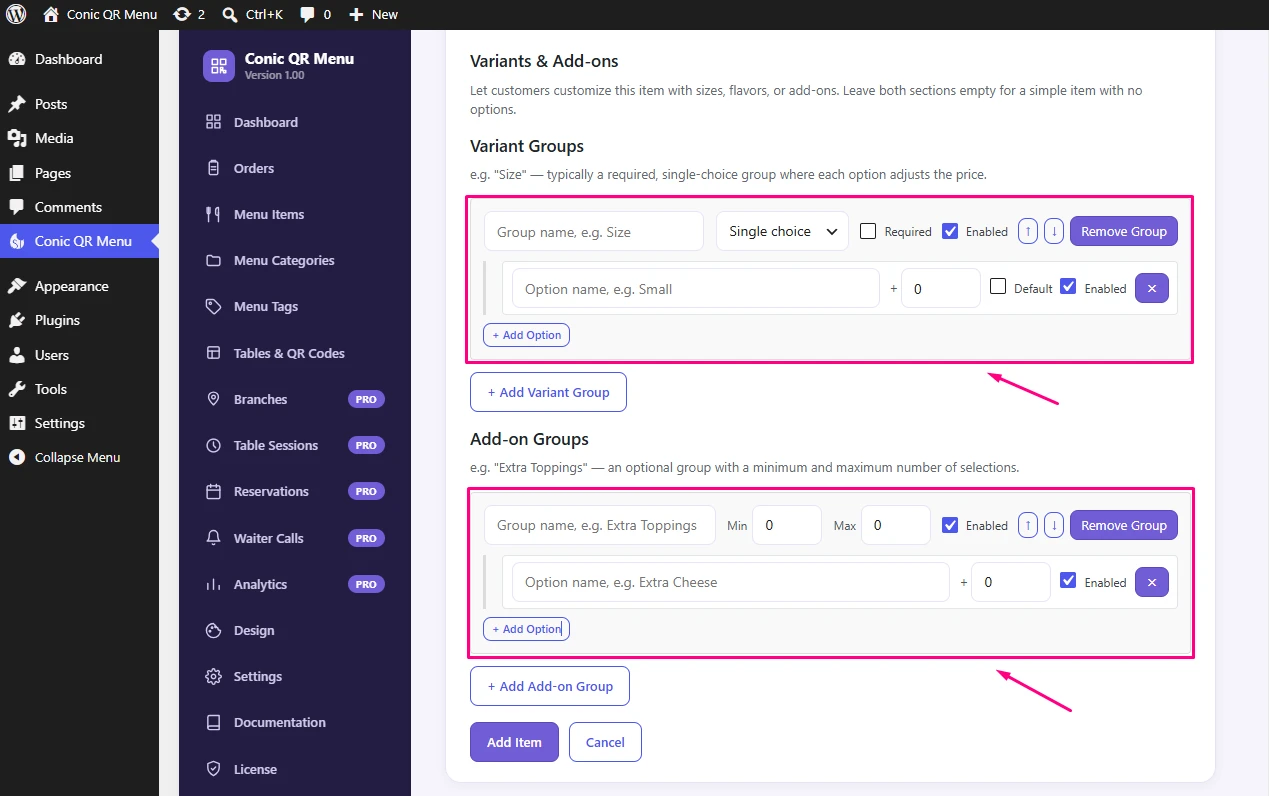
If an item comes in more than one size or style (Small/Medium/Large, Regular/Spicy), create a Variant Group on that item and set a price adjustment for each option — the customer picks exactly one. For optional extras (extra cheese, extra shot), use an Add-on Group instead, which lets customers pick as many as they want, each with its own price adjustment. Both appear automatically in the item's detail popup on the live menu.
Categories and tags
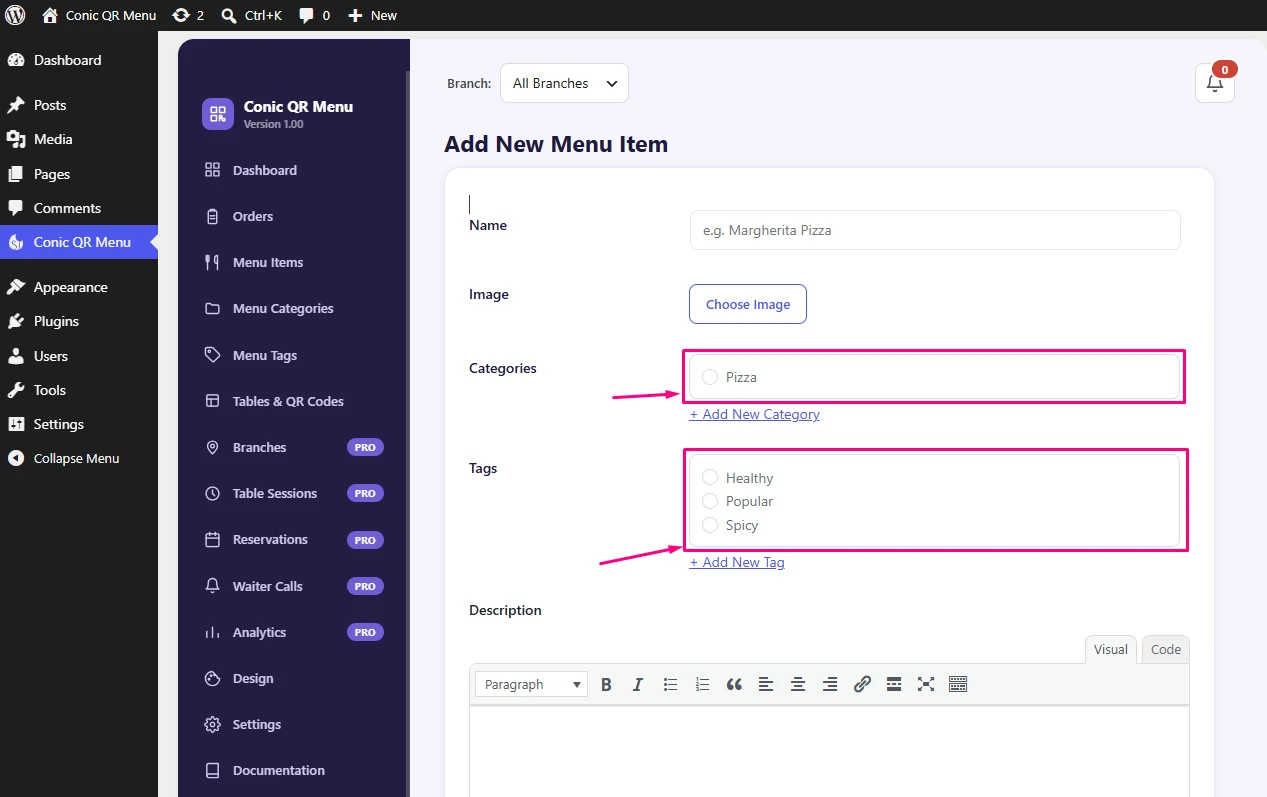
Every item belongs to a Category (Starters, Mains, Desserts) — drag categories from category page into the order you want them to appear, and add a category icon image. Use Tags for cross-cutting labels like "Spicy" or "Chef's Pick" that customers can filter by regardless of category.
Tables, QR codes, and the customer experience
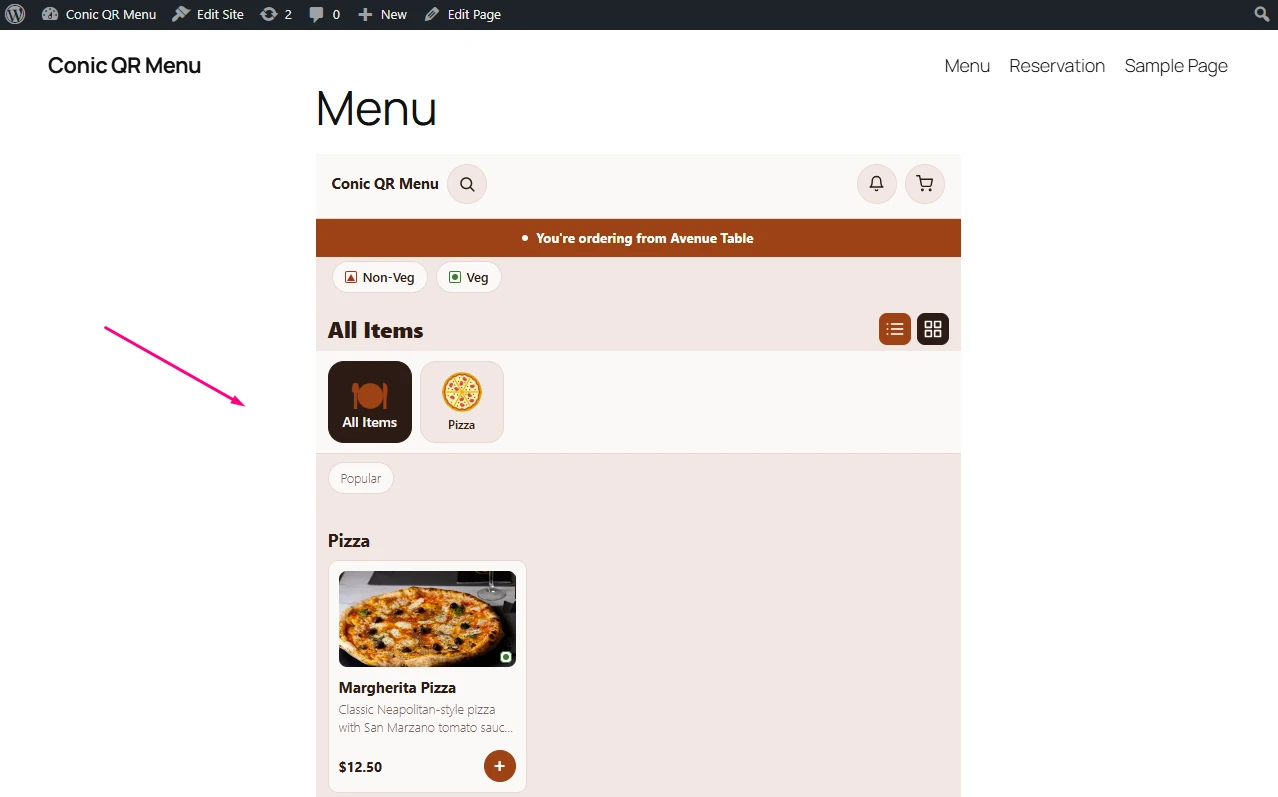
Each row on Tables & QR Codes generates a unique QR
code — download it as PNG or PDF for printing. When a customer scans
it and lands on your [rztqm_menu] page, they can search,
browse by category, filter by tag, tap a card's
Add button to quick-add a simple item straight to the
cart (with a toast confirming it), or tap the card itself to open the
full item detail popup when a variant or add-on choice is required.
From the cart they proceed straight to
Pay at Counter checkout — no card details needed,
they simply confirm the order and pay your staff directly.
Managing orders
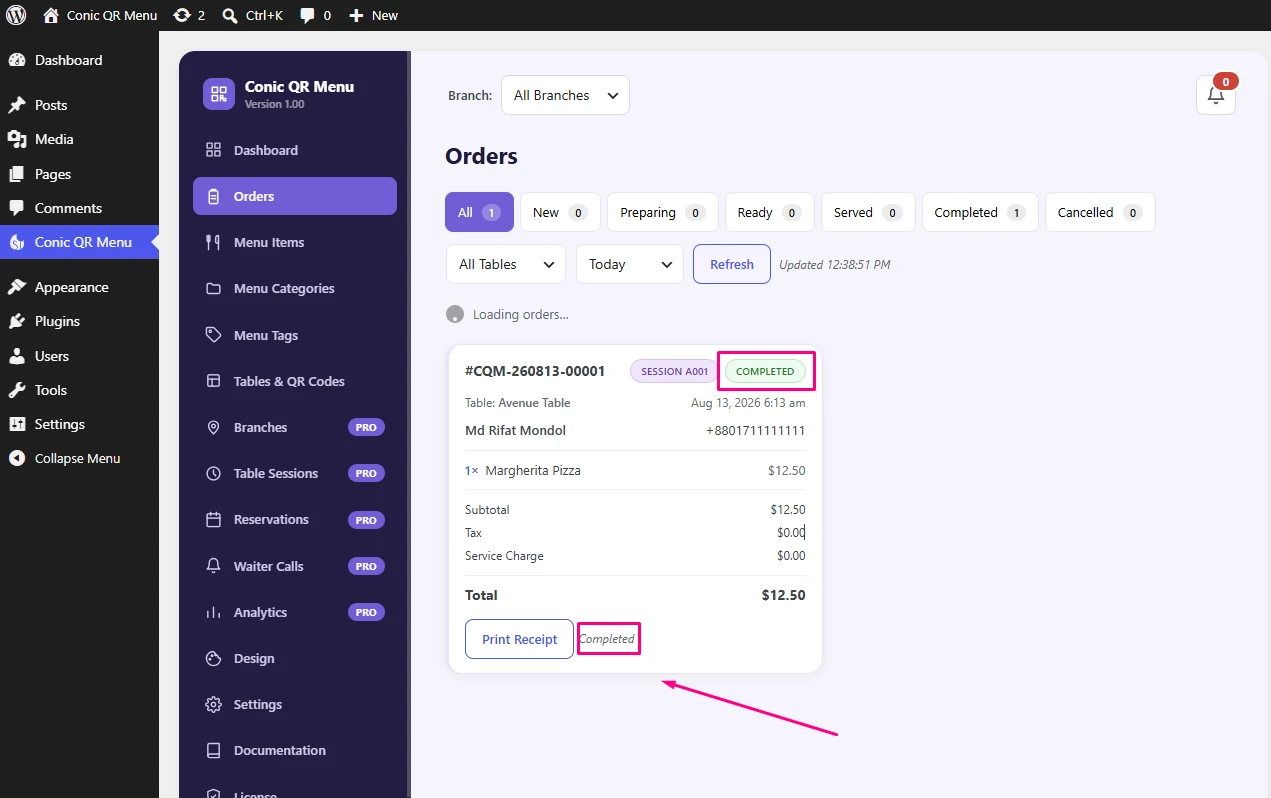
Keep Reztori QR Menu > Orders open at the counter or in the kitchen. New orders appear automatically (with an optional sound or browser notification) and move through New → Preparing → Ready → Served → Completed as staff work through them — update the status as each order is picked up and finished so nothing gets missed.
Changing how the menu looks
The Design screen controls the Menu Template and
Color every [rztqm_menu] shortcode uses by default.
Template 1 ("Modern Grid") includes a grid/list toggle and category
icon tabs for customers, plus card animations, a loading skeleton, and
a cart-pulse effect when they quick-add — changes here apply site-wide
immediately, with no need to touch the shortcode itself.
Restaurant-wide settings
Use Settings for anything that applies across the whole menu: restaurant name, logo, hero-image, tagline, cuisine/category label, address, currency, tax and service charge percentages, table/menu behavior, order notification preferences.
7. Using Pro Features (Requires License)
Once your Pro license key is activated (see Plugin Activation), these extra screens appear in the sidebar. Each one is optional — turn on only what your restaurant actually needs.
Running more than one location
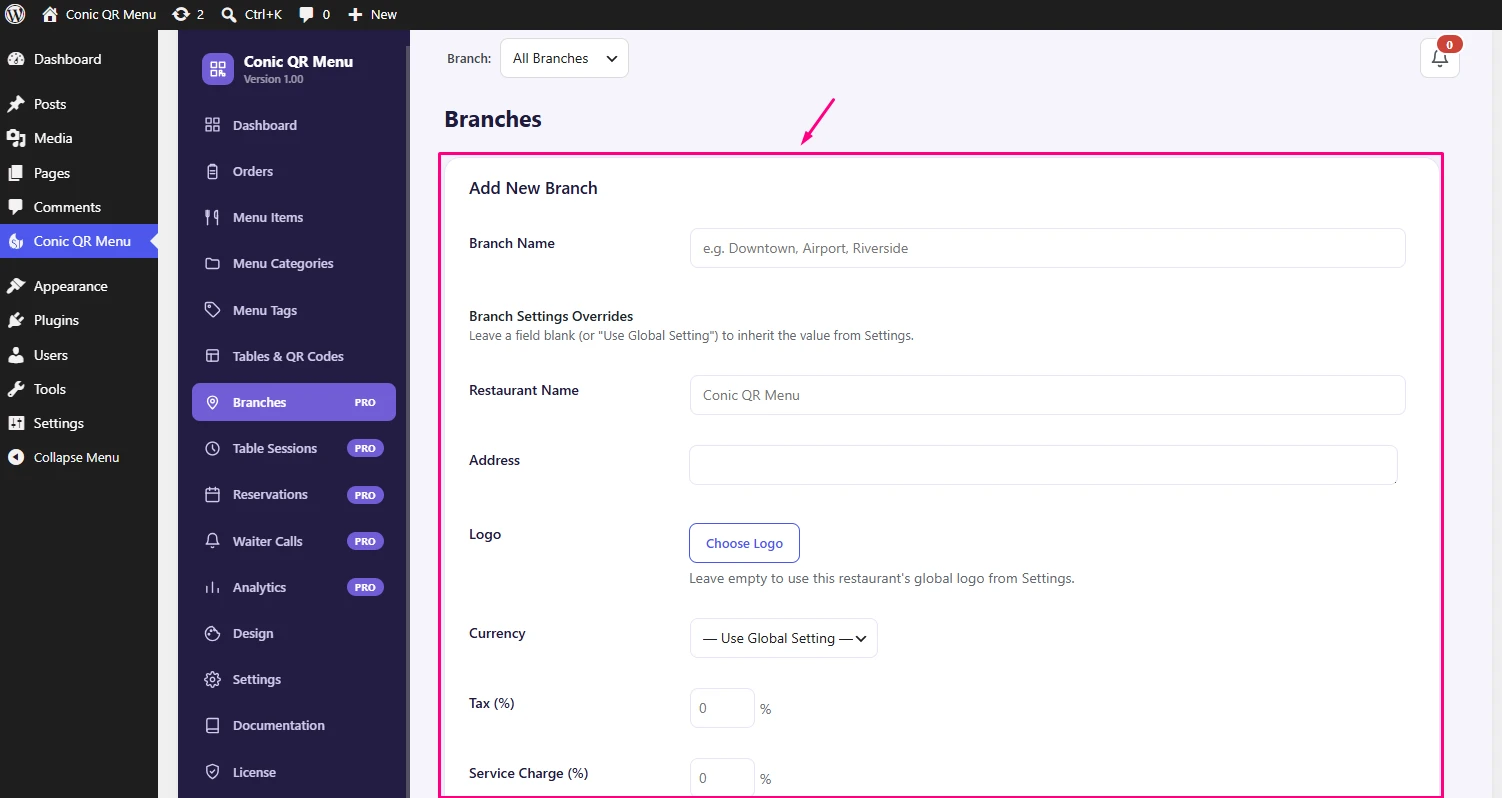
Turn on Reztori QR Menu → Settings → Multi-Branch to
manage several restaurant locations from one WordPress site. Each
branch gets its own menu, tables, orders, sessions, and settings
overrides, so a change to one branch's prices or hours never affects
the others. Point each location's QR codes at the same
[rztqm_menu] page — the plugin serves the right branch
based on which table was scanned.
Running a tab and splitting the bill
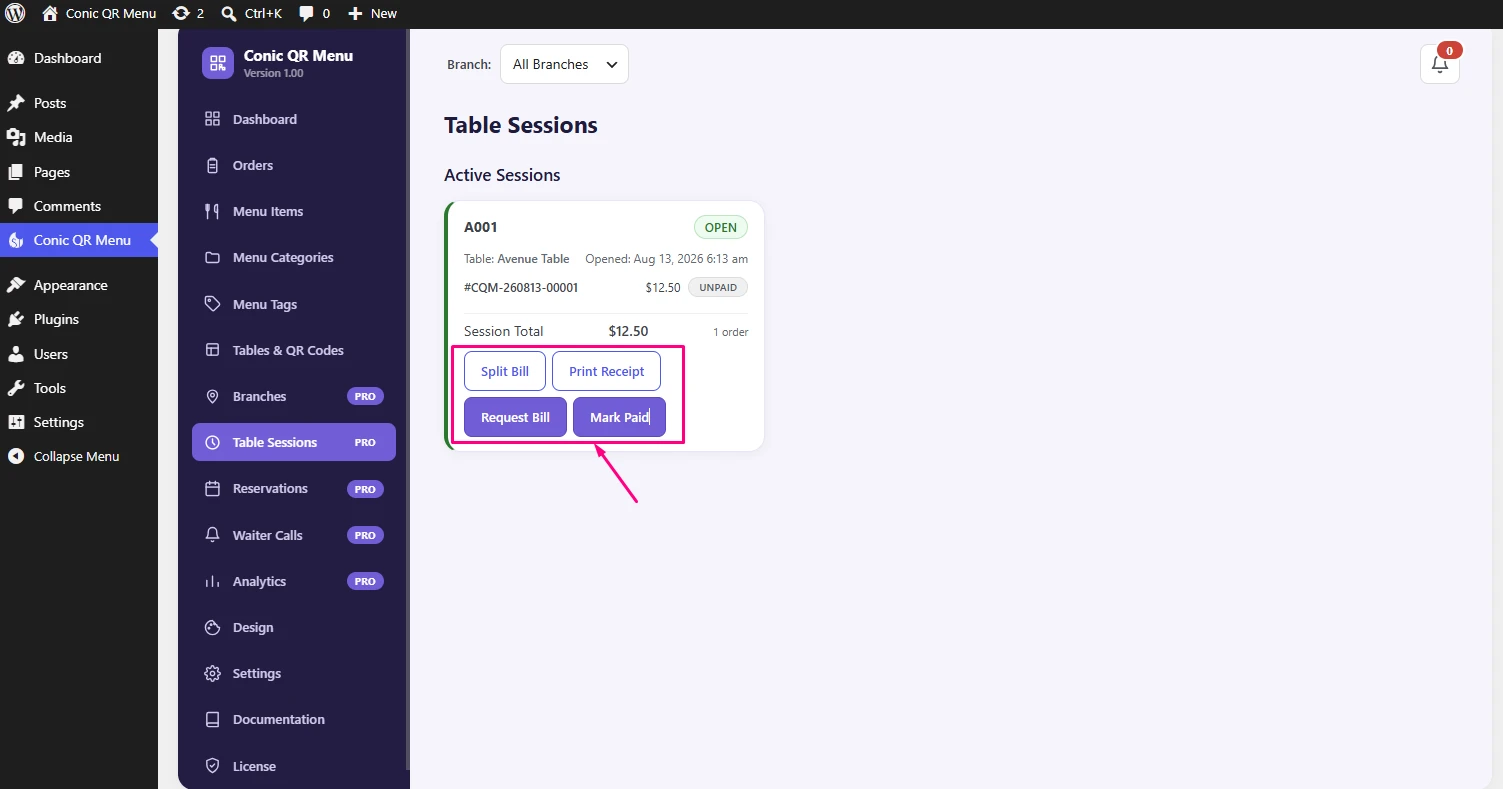
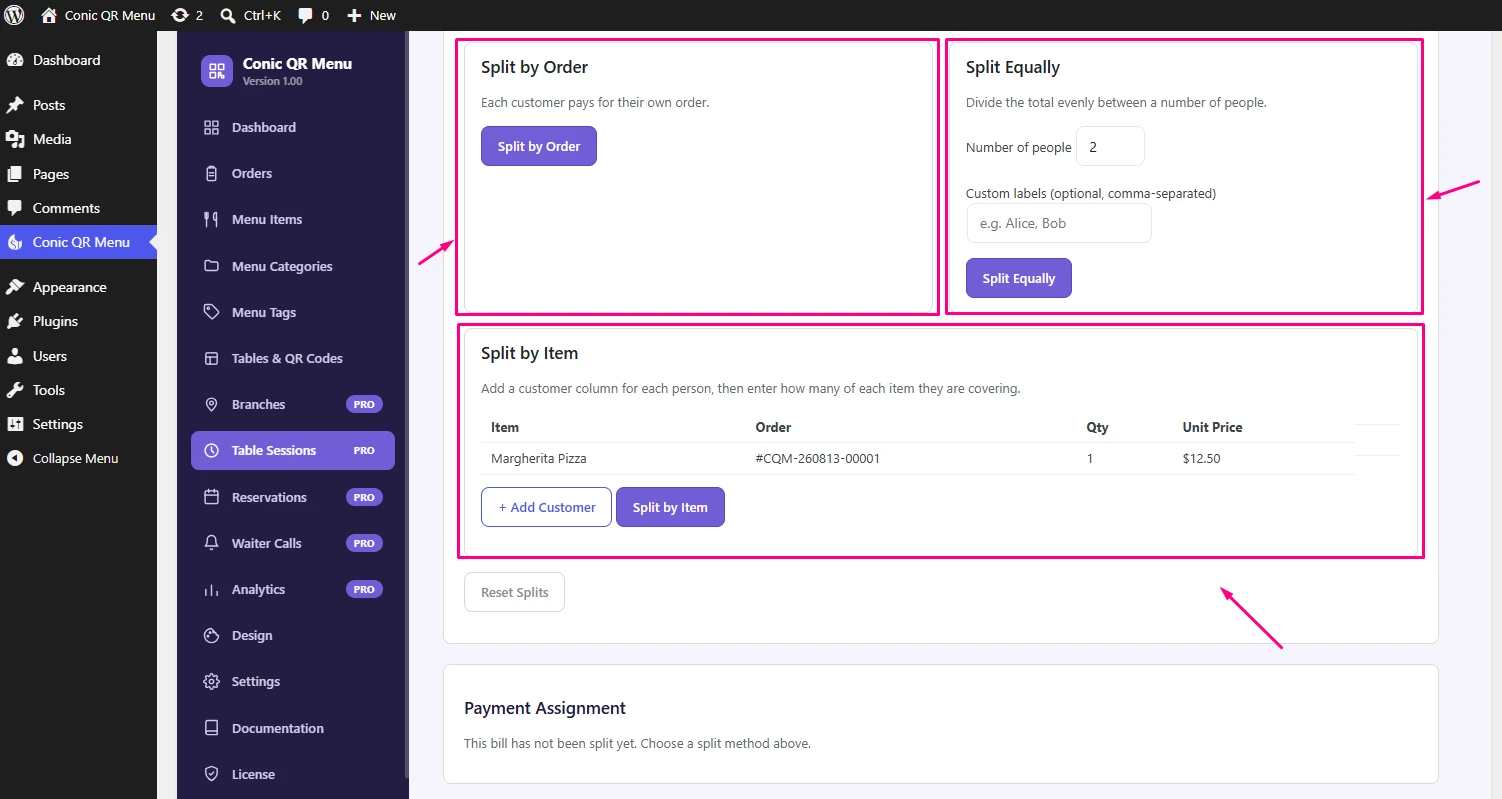
Enable Reztori QR Menu → Settings → Table Sessions so repeat orders from the same table are grouped into one running total instead of billed separately — useful for tables that order in rounds. When it's time to settle up, use Bill Splitting to divide that session's total by individual order, by item quantities, or into equal shares between guests.
Taking bookings
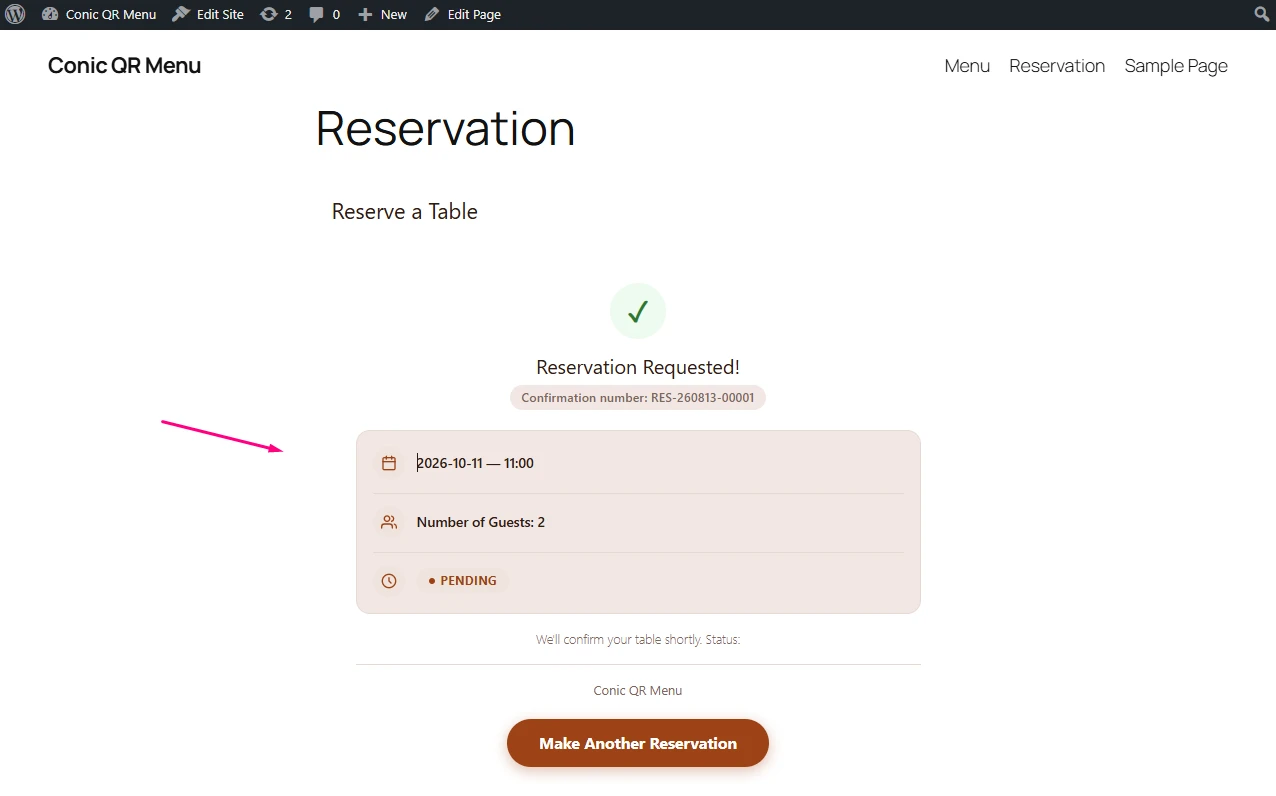
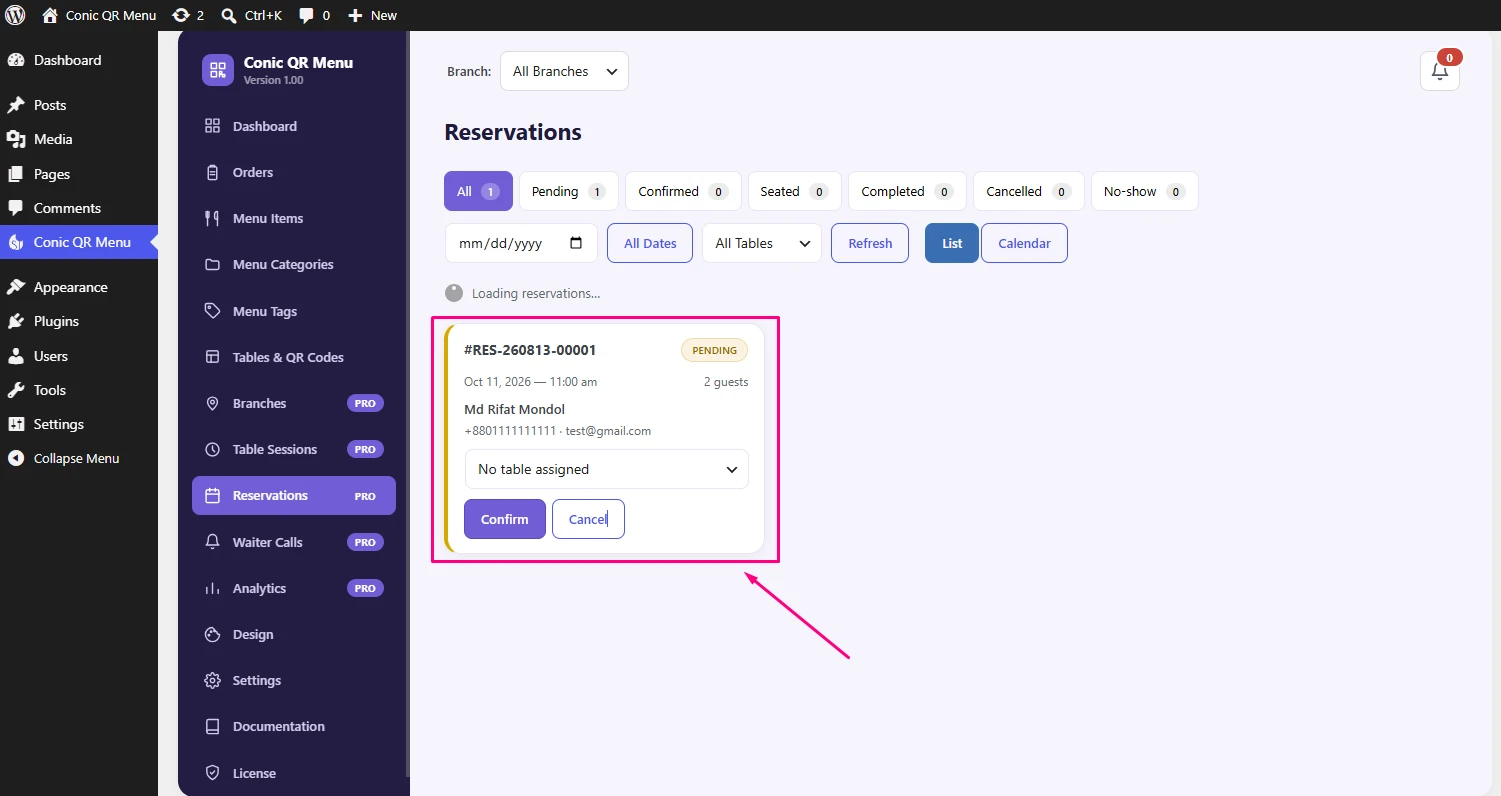
Set up Reztori QR Menu → Settings → Reservations by
defining your business hours, typical booking duration, seating
capacity, any blackout dates, and how far in advance guests can book.
Once configured, add the [rztqmp_reservation] shortcode
to a page so customers can request a table directly from your site.
New requests appear on a live staff dashboard with sound, toast, and
browser notifications so nobody misses one.
Letting guests call a waiter
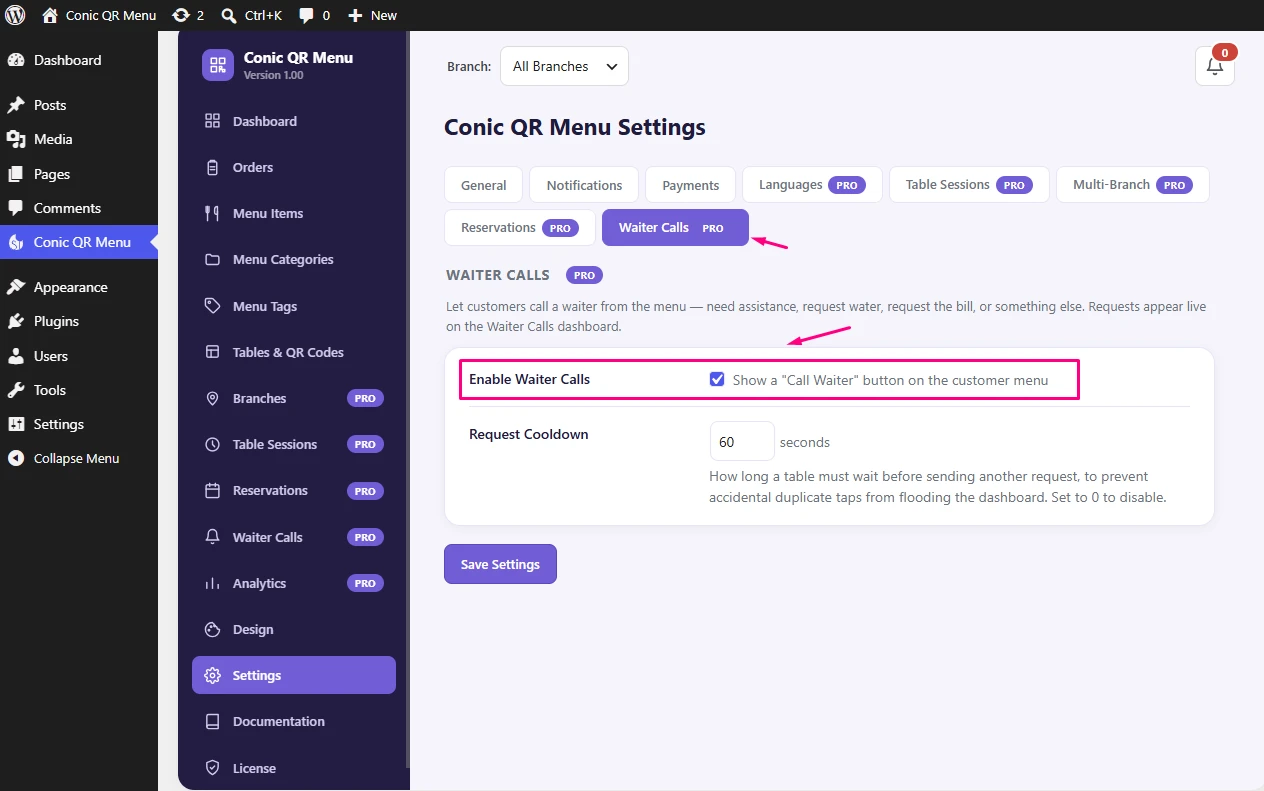
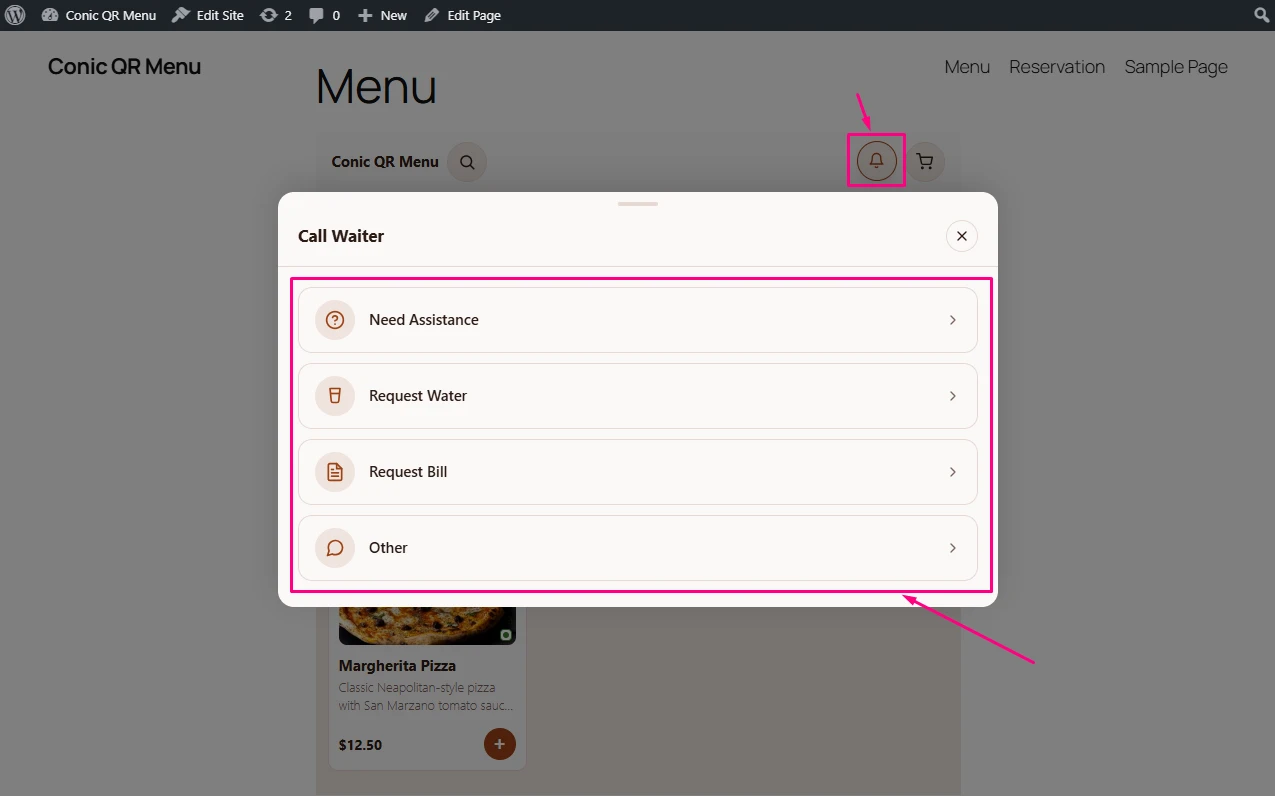
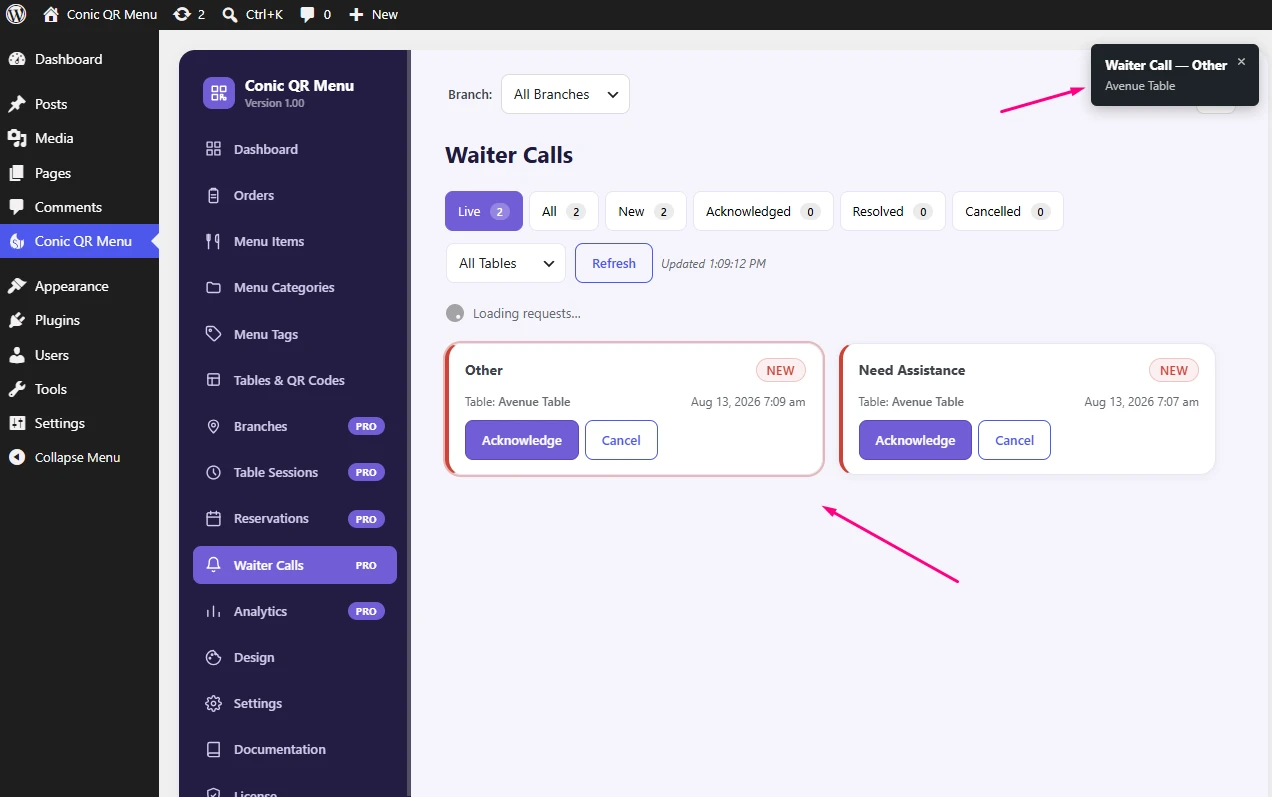
Turn on Reztori QR Menu → Settings → Waiter Calls to add a "Call Waiter" button to the customer-facing menu. Requests land on the same kind of live-polling staff dashboard, with a configurable cooldown so a guest can't accidentally spam the button.
Understanding your sales
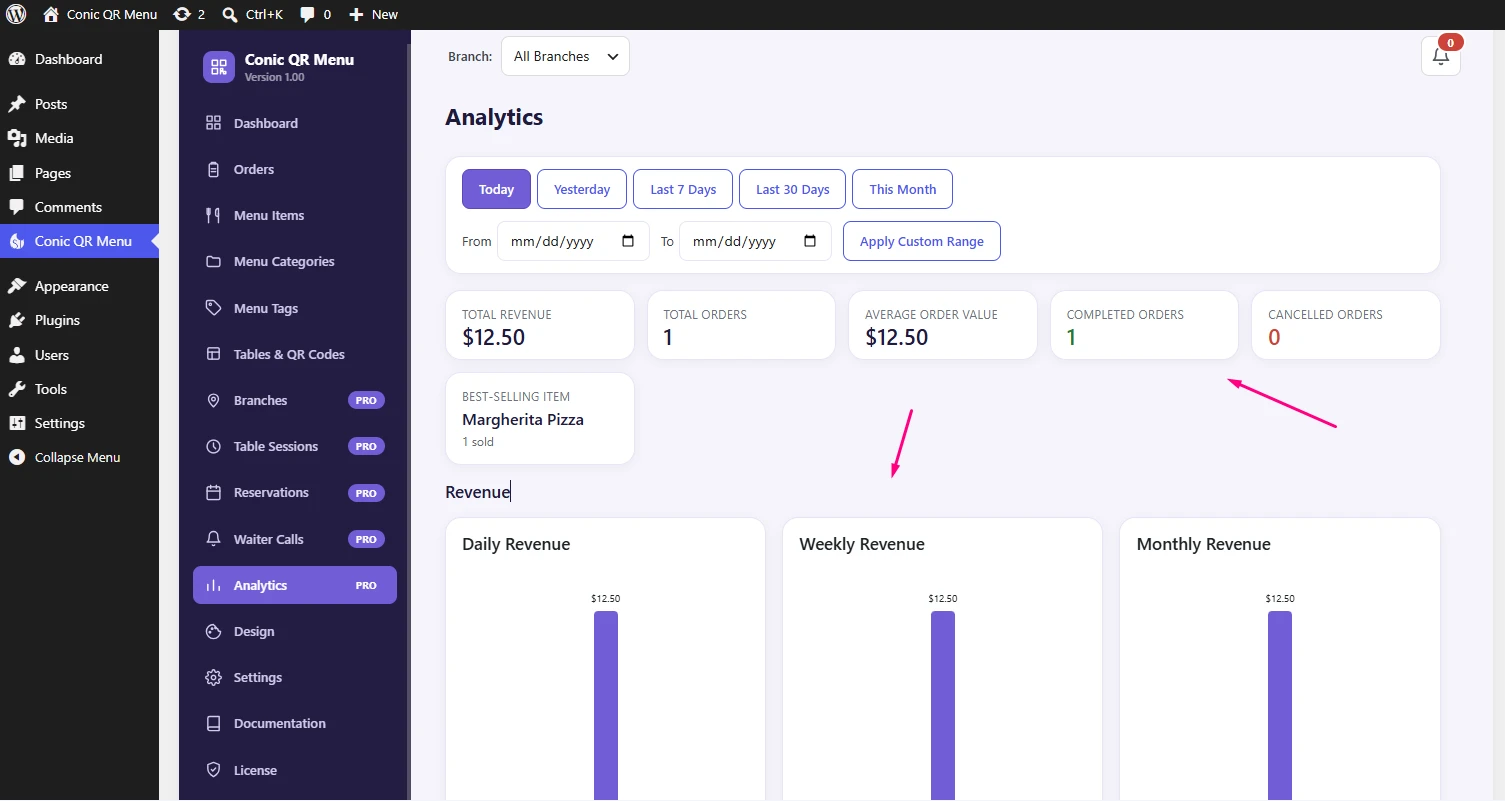
Check Analytics for revenue, order volume, and best-selling items over any date range — use it weekly or monthly to spot what's selling and adjust your menu or staffing accordingly.
Serving menus in other languages
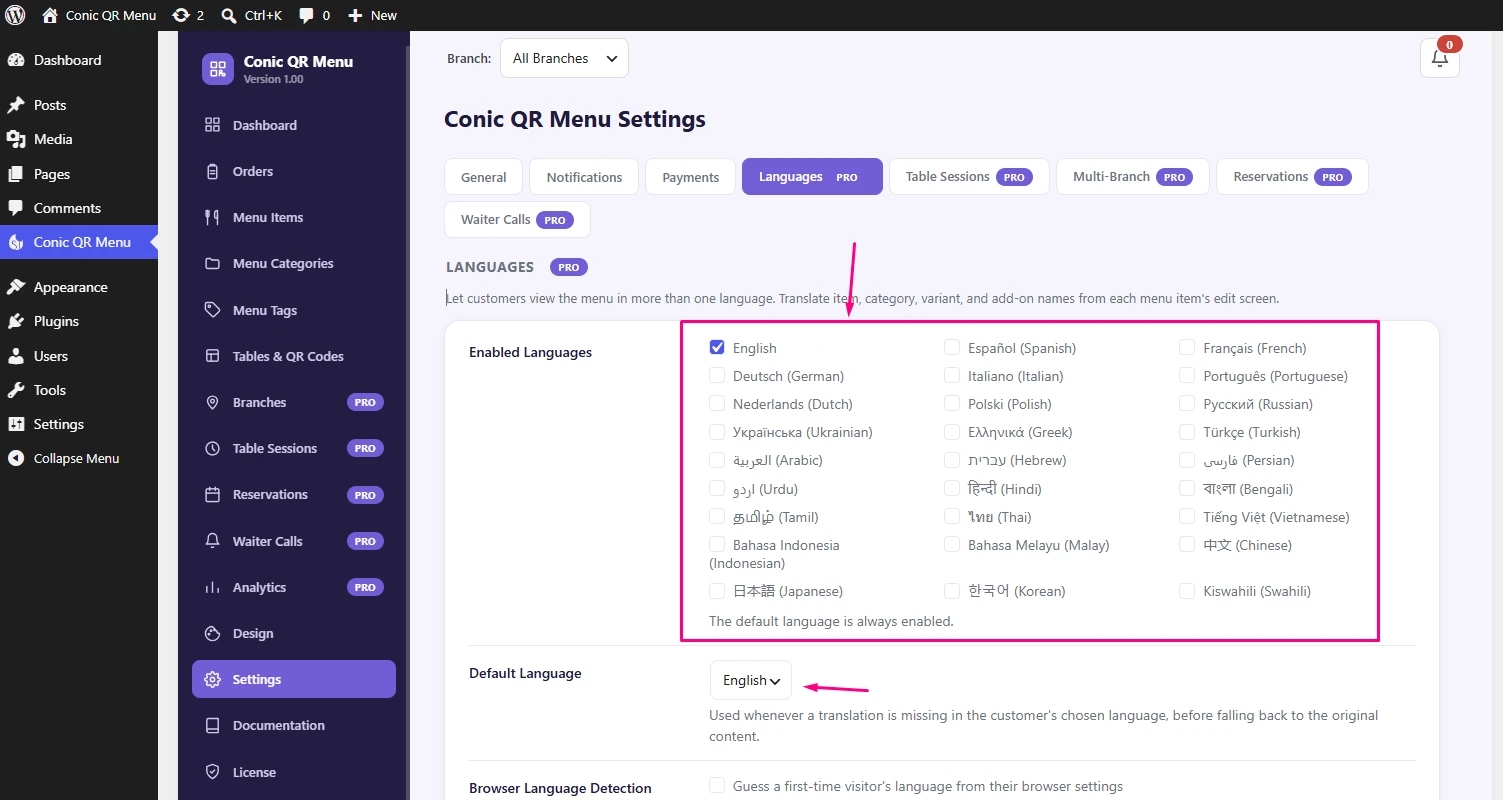
Under Reztori QR Menu → Settings → Language, add translations for individual items, categories, and variants. Turn on browser-language detection so international customers automatically see the menu in their own language, with the choice remembered for their next visit.
Accepting card payments
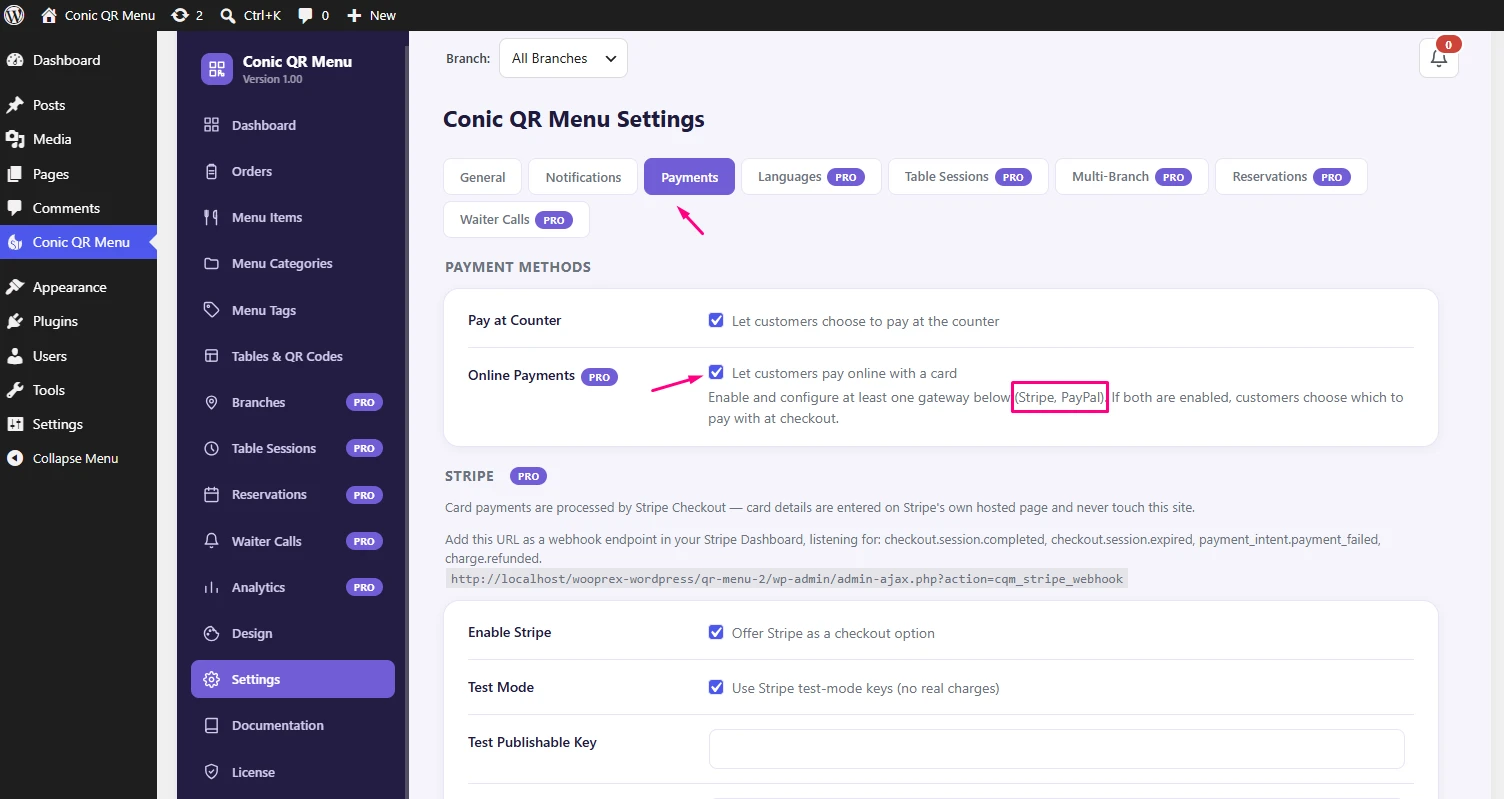
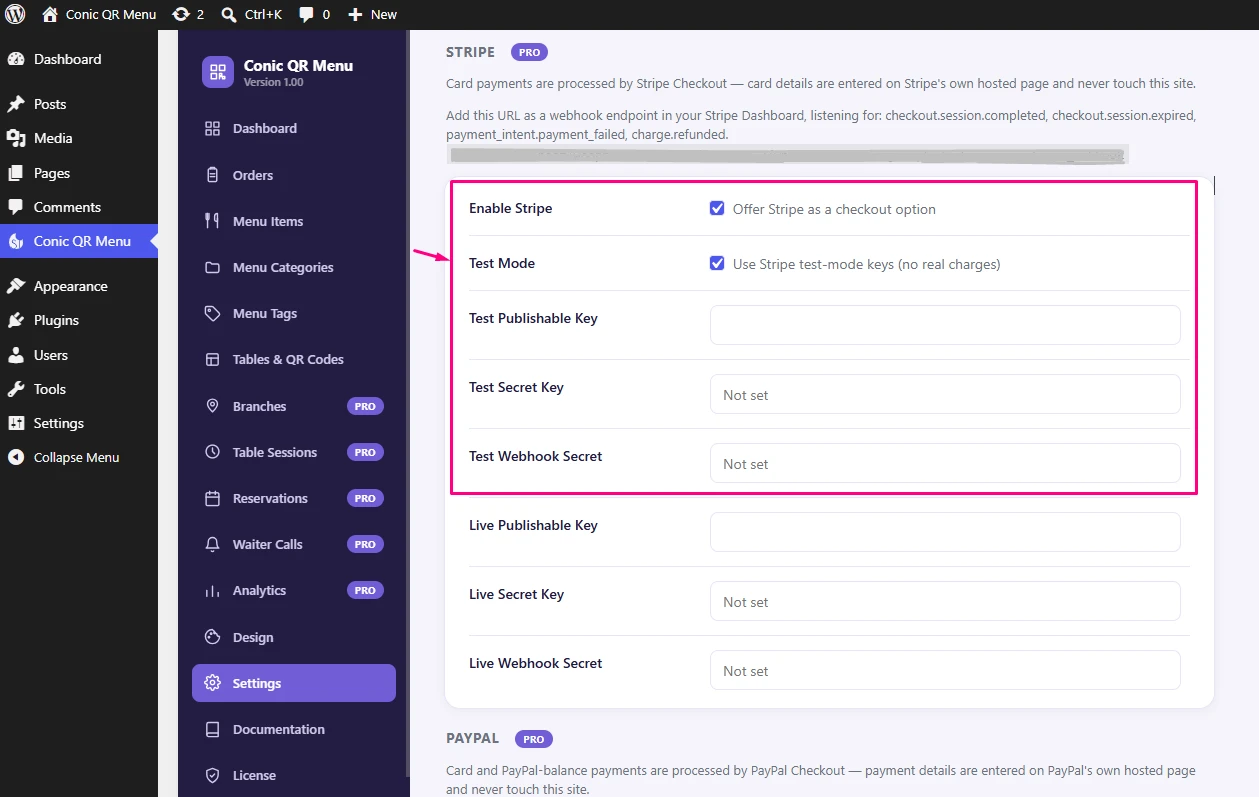
Connect Stripe or PayPal under Reztori QR Menu → Settings → Language to let customers pay online instead of at the counter. Test everything in sandbox/test mode first, then switch to live mode once you've confirmed a full order goes through correctly end-to-end.
You can also accept counter payments for free, allowing customers to pay in person without connecting an online payment provider.
Premium templates and per-page overrides
The Design screen unlocks two more layouts — Template 2 ("Rustic
List") and Template 3 ("Menu Explorer," which adds a "Popular Picks"
browse screen, a tabbed per-category list, and a fuller item popup
with weight and allergen details) — plus sevem extra tempalte color
(Luxury Restaurant, Fast Food, Healthy/Organic, Seafood, Wine Bar,
Craft Pub, and Custom Brand Colors). To use a different template or
color on one specific page only, add a template and/or
color attribute to that page's shortcode instead of
changing the site-wide Design setting — see the
Shortcode API Reference for the exact
syntax.
8. Shortcode API Reference
Embed your customer menu or reservation system anywhere on your site using clean shortcode tags and attributes:
-
Standard Menu Display:
[rztqm_menu]— Uses whichever Menu Template and Color are chosen on the Design page. -
Instance Template Override:
[rztqm_menu template="2"]or[rztqm_menu template="3"]— PRO Rustic List or Menu Explorer layout on this page only, whatever the Design page says. -
Template Color Override:
[rztqm_menu color="seafood"]or[rztqm_menu template="2" color="wine-bar"]— PRO Apply a specific template color or combine both attributes for just this page. -
Reservation Form Display:
[rztqmp_reservation]— PRO Displays the table-booking request form, styled with the current Template Color. No attributes needed; every setting comes from the Settings page.
Note: Template and color overrides require an active Pro license. Unlicensed sites will automatically fall back to the site-wide design choice.
9. Contact & Support
Need assistance with setup or have questions about your license? Reach out to our technical support team directly.
Get in Touch
Visit our official contact page or send us an email for prompt assistance.
© 2026 Reztori QR Menu by Softiconic. All rights reserved.